Google Analytics Setup
Want Your Google Analytics to Display Conveniently on your Dashboard?
Follow the instructions and steps that follow below to integrate Google Analytics to your Best Way Websites Dashboard and then you will have the stats conveniently, automatically load for you whenever you login to the CMS (website editor).
If You Don't Have to Have them on Your Dashboard ...
Having the google analytics on your dashboard is convenient, but you can get to them directly from google.
- Note: you may always access your Google Analytics (if you have them set up) directly from Google here: https://analytics.google.com
Step by Step Instructions with Screenshots are Below
There are a total of about 30 steps including sub-steps. Be prepared to spend a few hours completing this
Want a Pro to Do it For You?
If you don't want to do this yourself, or it is too complex for you to follow, you may submit a ticket with this request and we will do it all for you for a one-time $100 webmaster fee.
Follow the Steps Below
Step 1. Ensure that Your Website Has a Published Privacy Policy
Before you start ... your website must have a privacy policy. A terms of service page is optional.
We suggest that you combine your policies into one page and simply call it "Website Policies".
- Note that there will be [GENERIC BOXES] and (generic parentheses sections) that you MUST edit to for you company!
- Tap here for a generic website policies page.
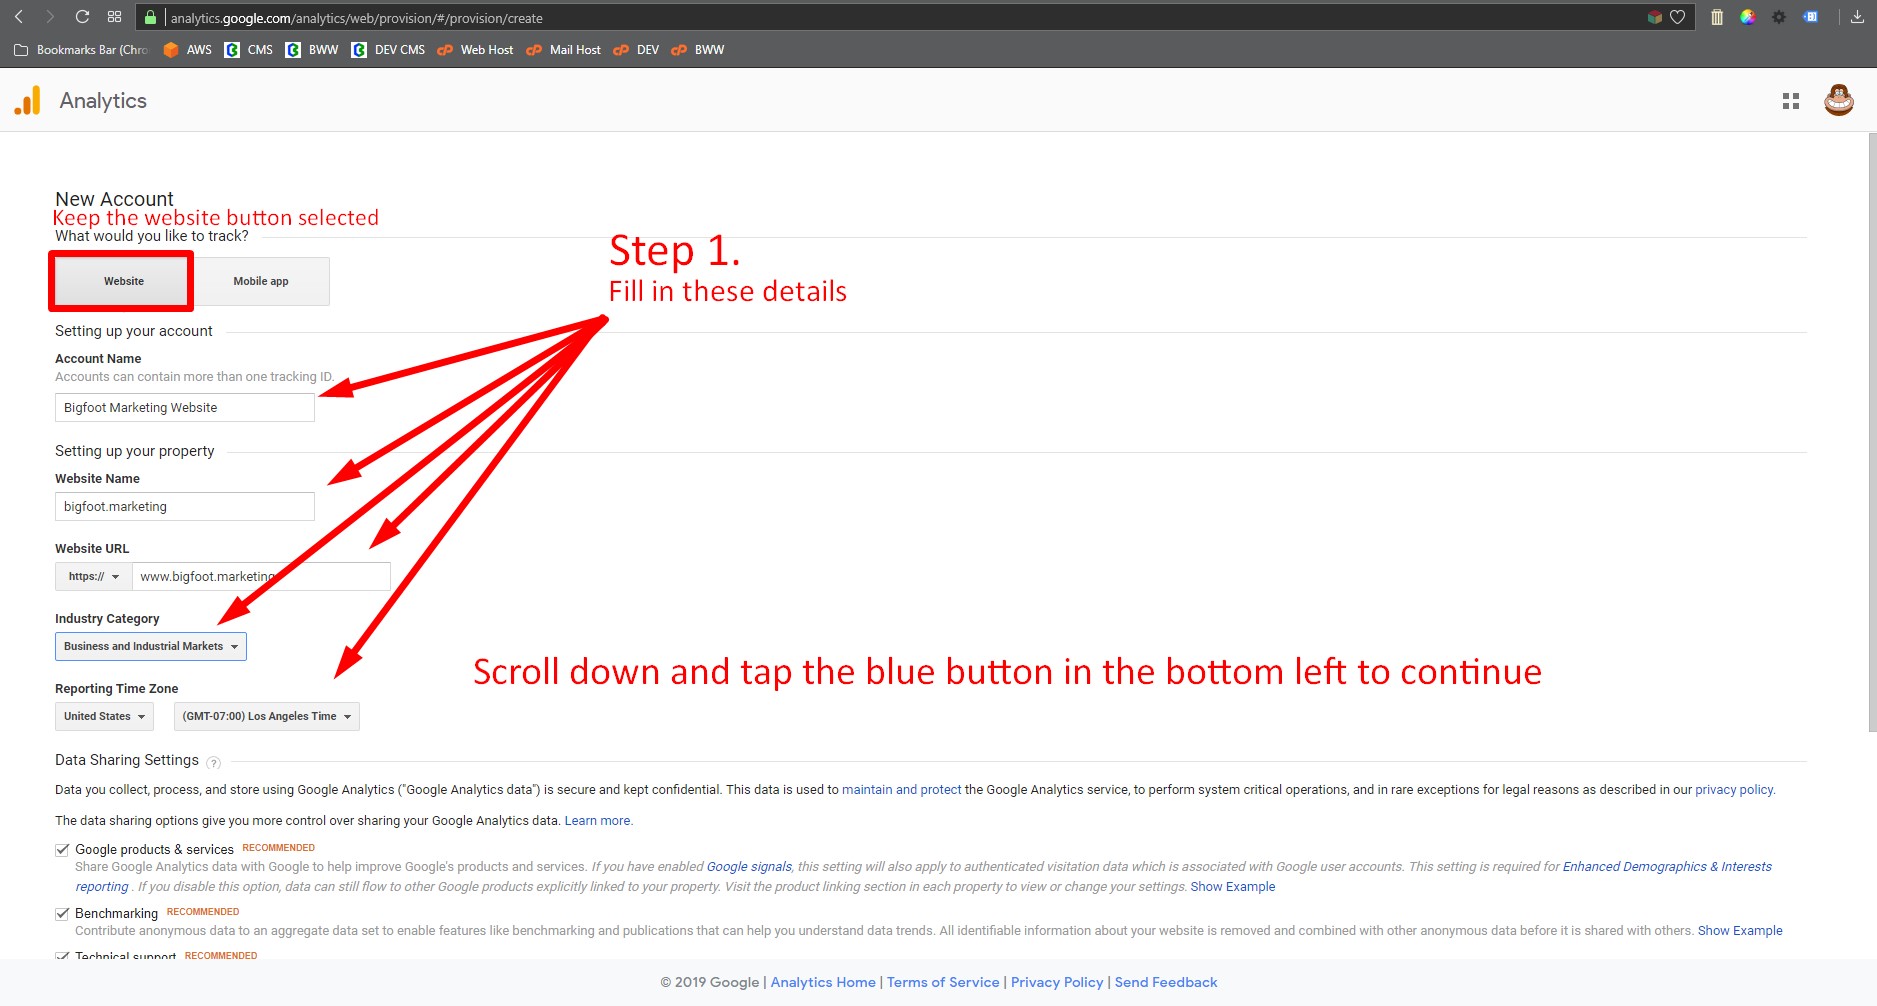
Step 2. Login to Google Analytics: https://analytics.google.com
- Link is here: https://analytics.google.com
- You are creating a new account
- Make sure you select the Website button
- Fill in account name, website name, url
- See the screenshot below
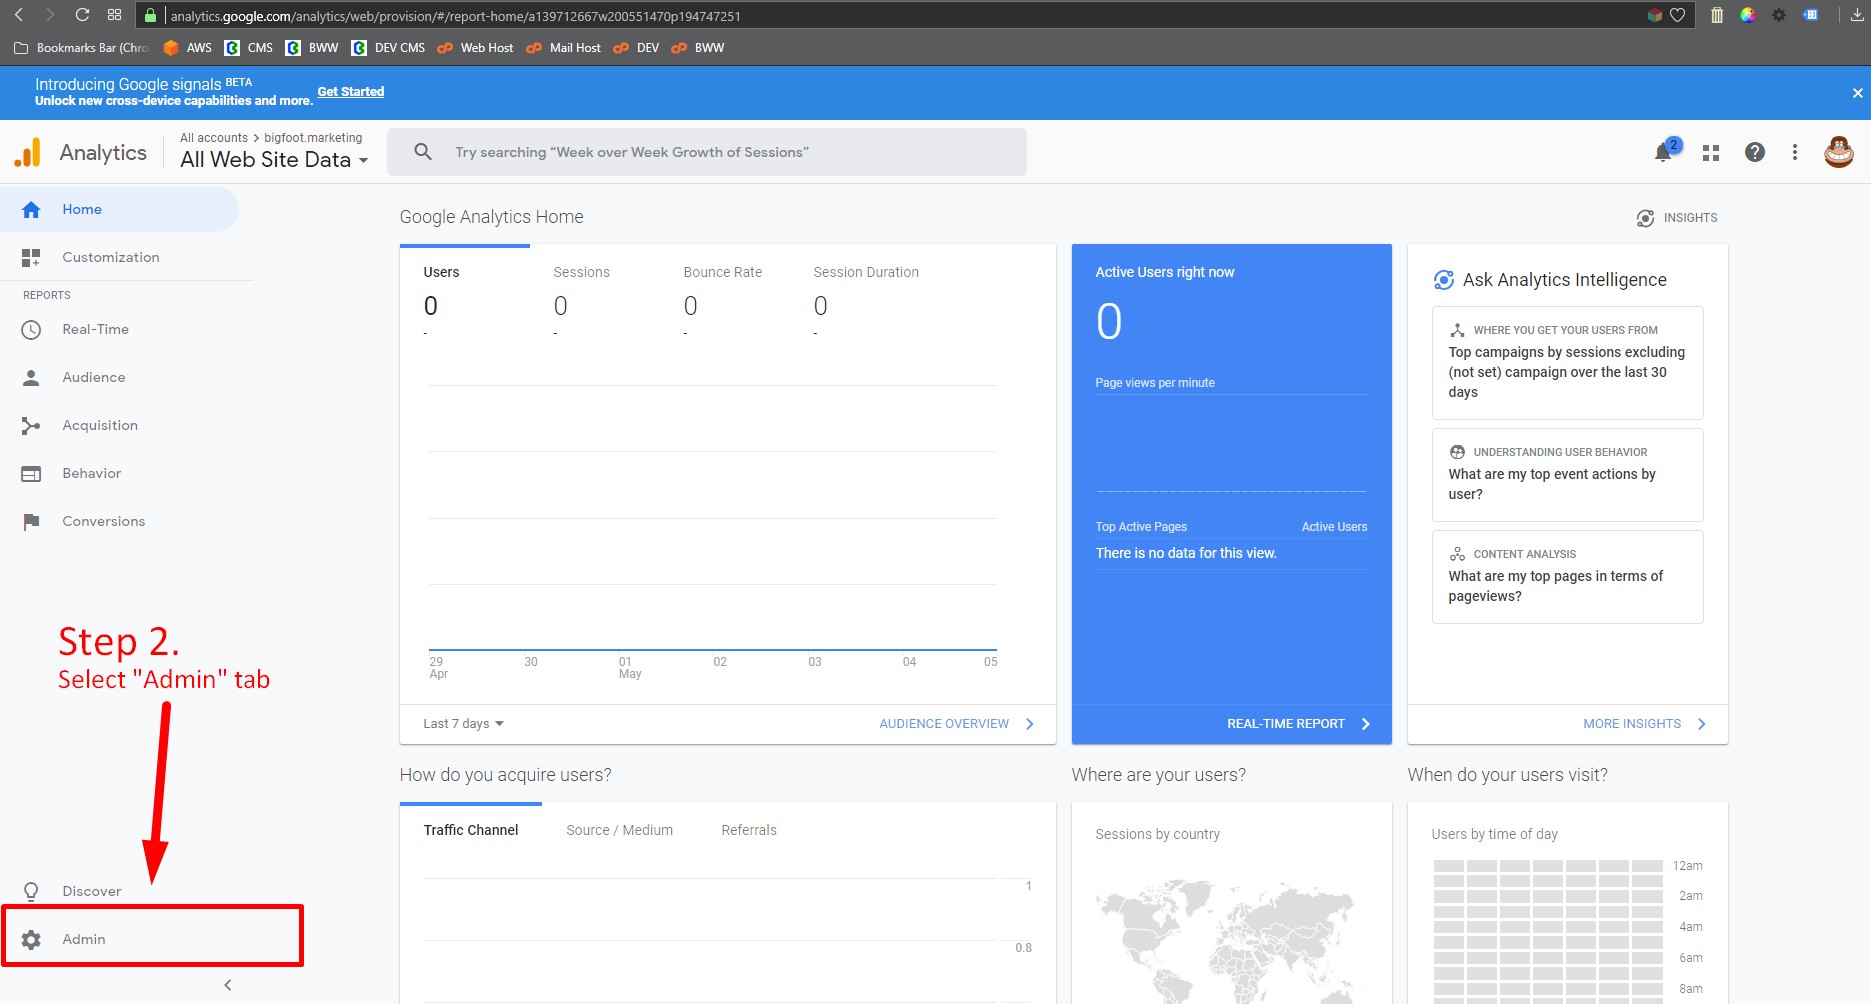
Step 3. Tap on Admin tab in Google Analytics
- Tap on the admin tab
- You'll have to scroll down the page a bit to see it
- See the screenshot below
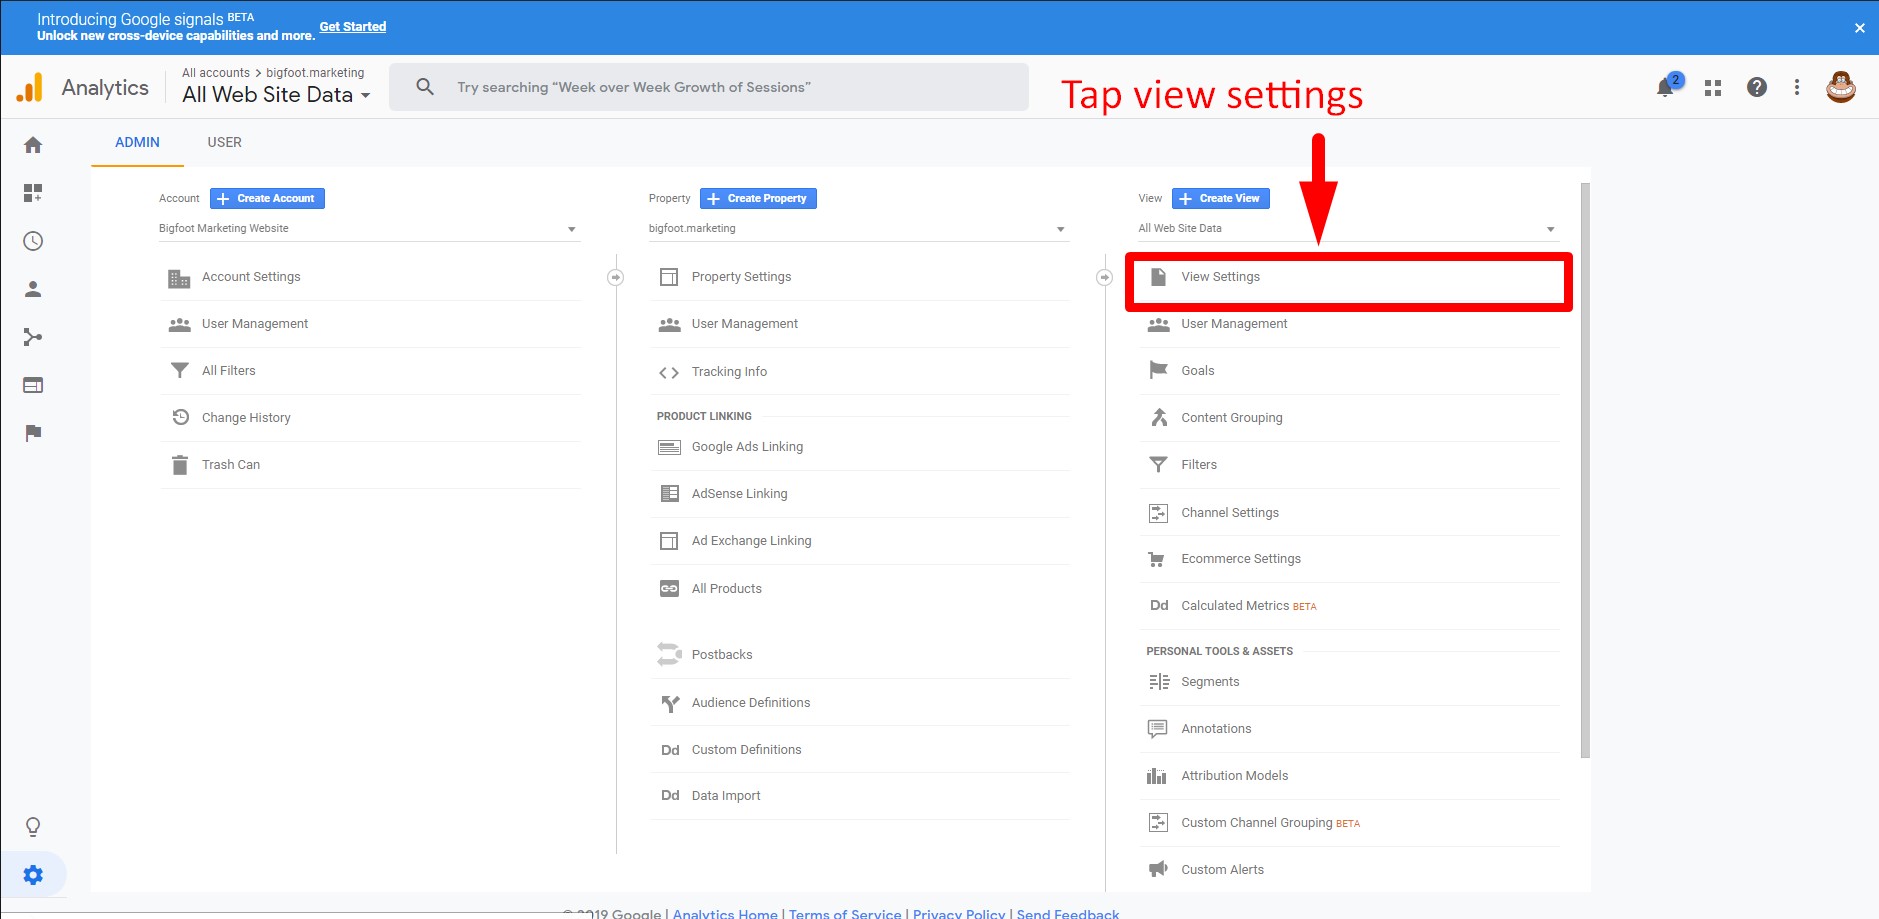
Step 4. Tap View Settings
- Staying on Admin Section
- Under All Web Site Data
- Tap view settings (right side of page on screen unless using pad or smartphone)
- See screenshot below
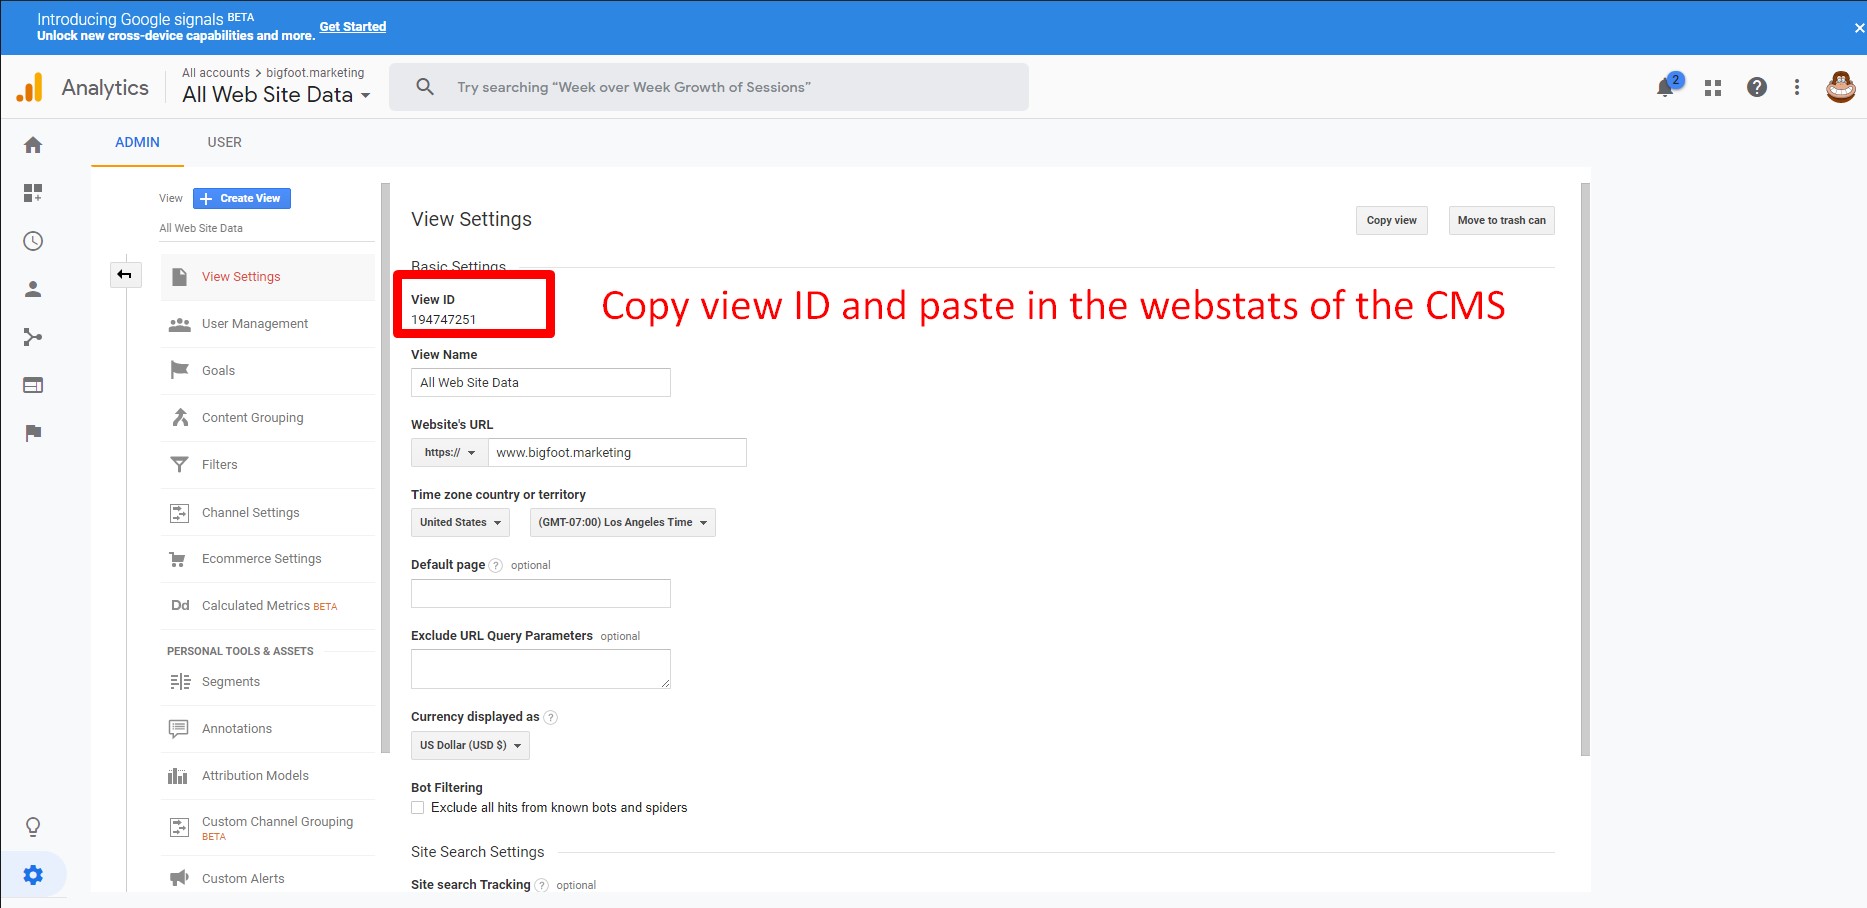
Step 5 - Copy the View ID
- Still in Admin section
- After having selected View Settings menu will be on left
- Look for View ID (numeral) on right side
- Copy this ID (you will need to paste this ID in the webstats of the CMS
- See screenshot below
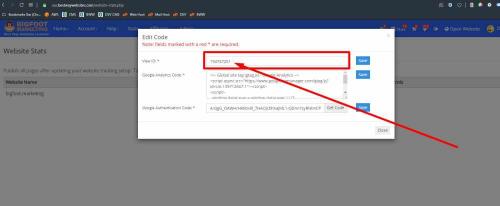
Step 6. Paste the View ID into the CMS
- If you are not logged in to the CMS, login
- Go to Stats > Webstats > Setup Google Analytics
- You'll also see a link to "Setup Google Analytics" on the CMS home page dashboard and also on Webstats
- Paste the View ID
- See the screenshot below
Step 7. Copy the Global Site Tag CMS Webstats
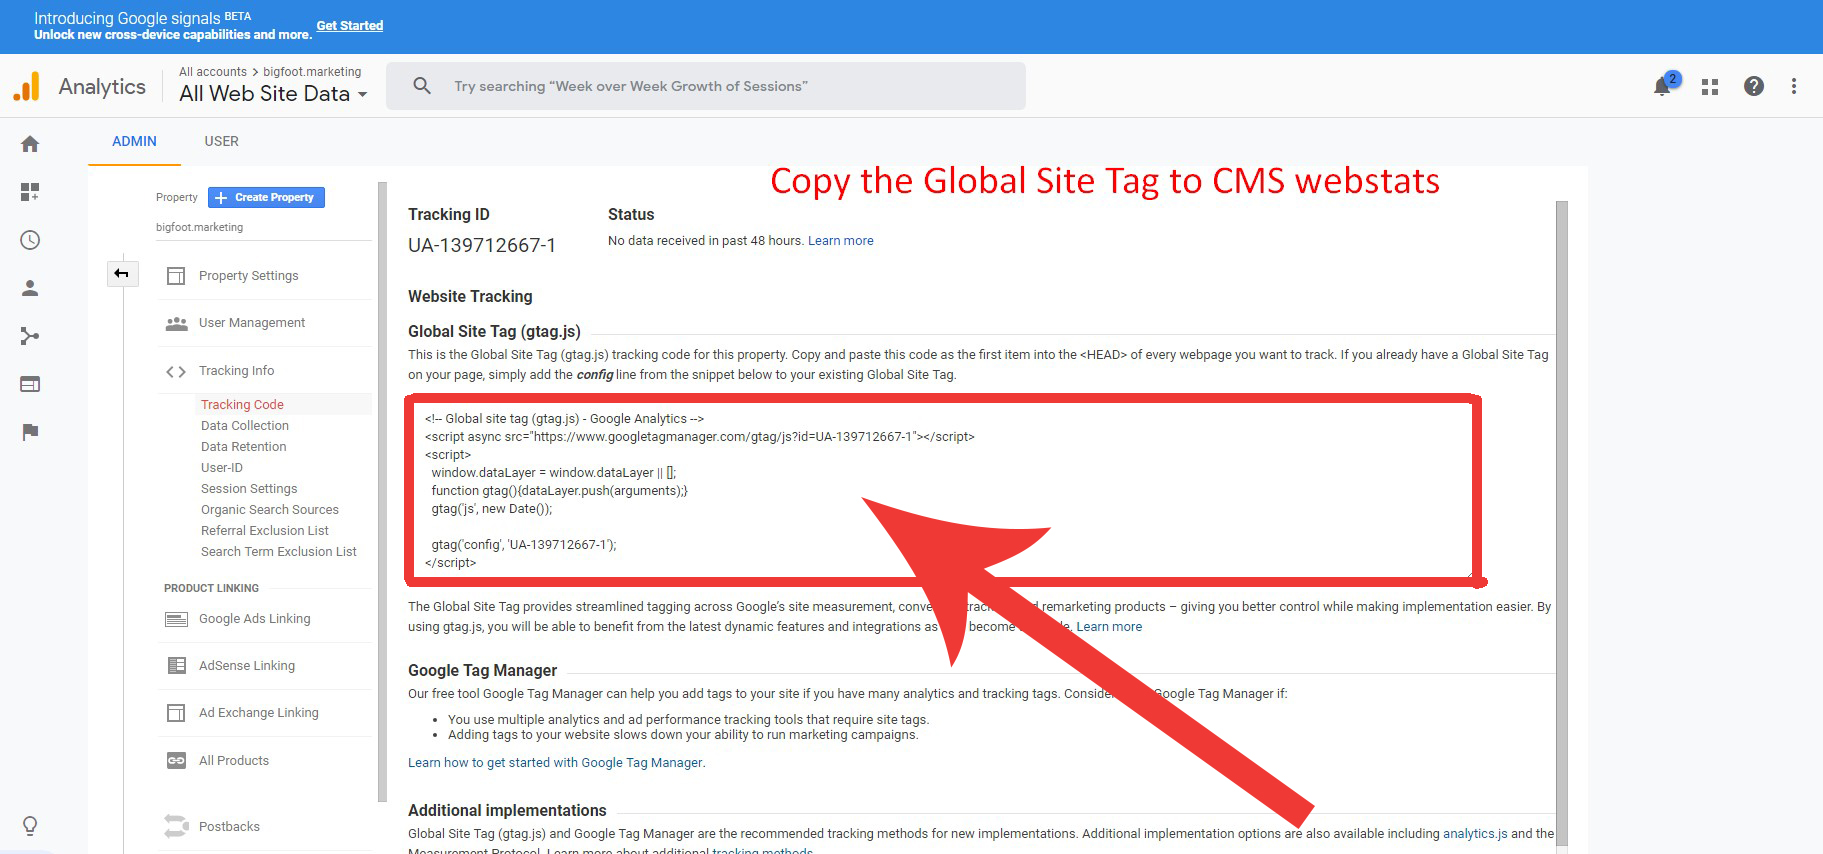
- You will see the Tracking ID at top of page
- Then Website Tracking
- Your Global Site Tag is below it (gtag.js)
- You will need to copy this code and paste it into the CMS webstats
- See screenshot below
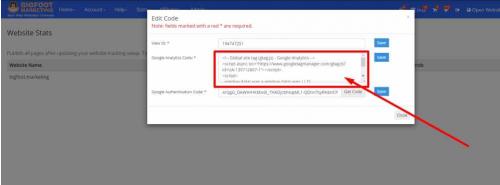
Step 8. Paste the Global Site Tag into CMS Webstats
- If you are not logged in to the CMS, login
- Go to Stats > Webstats > Setup Google Analytics
- You'll also see a link to "Setup Google Analytics" on the CMS home page dashboard and also on Webstats
- Paste the Global Site Tag
- See the screenshot below
Step 9. Go to https://console.developers.google.com/apis/library
- Visit this URL: Login to: https://console.developers.google.com/apis/library
- Login
- Scroll down page to find Analytics API
- Tap on it
- See screenshot below
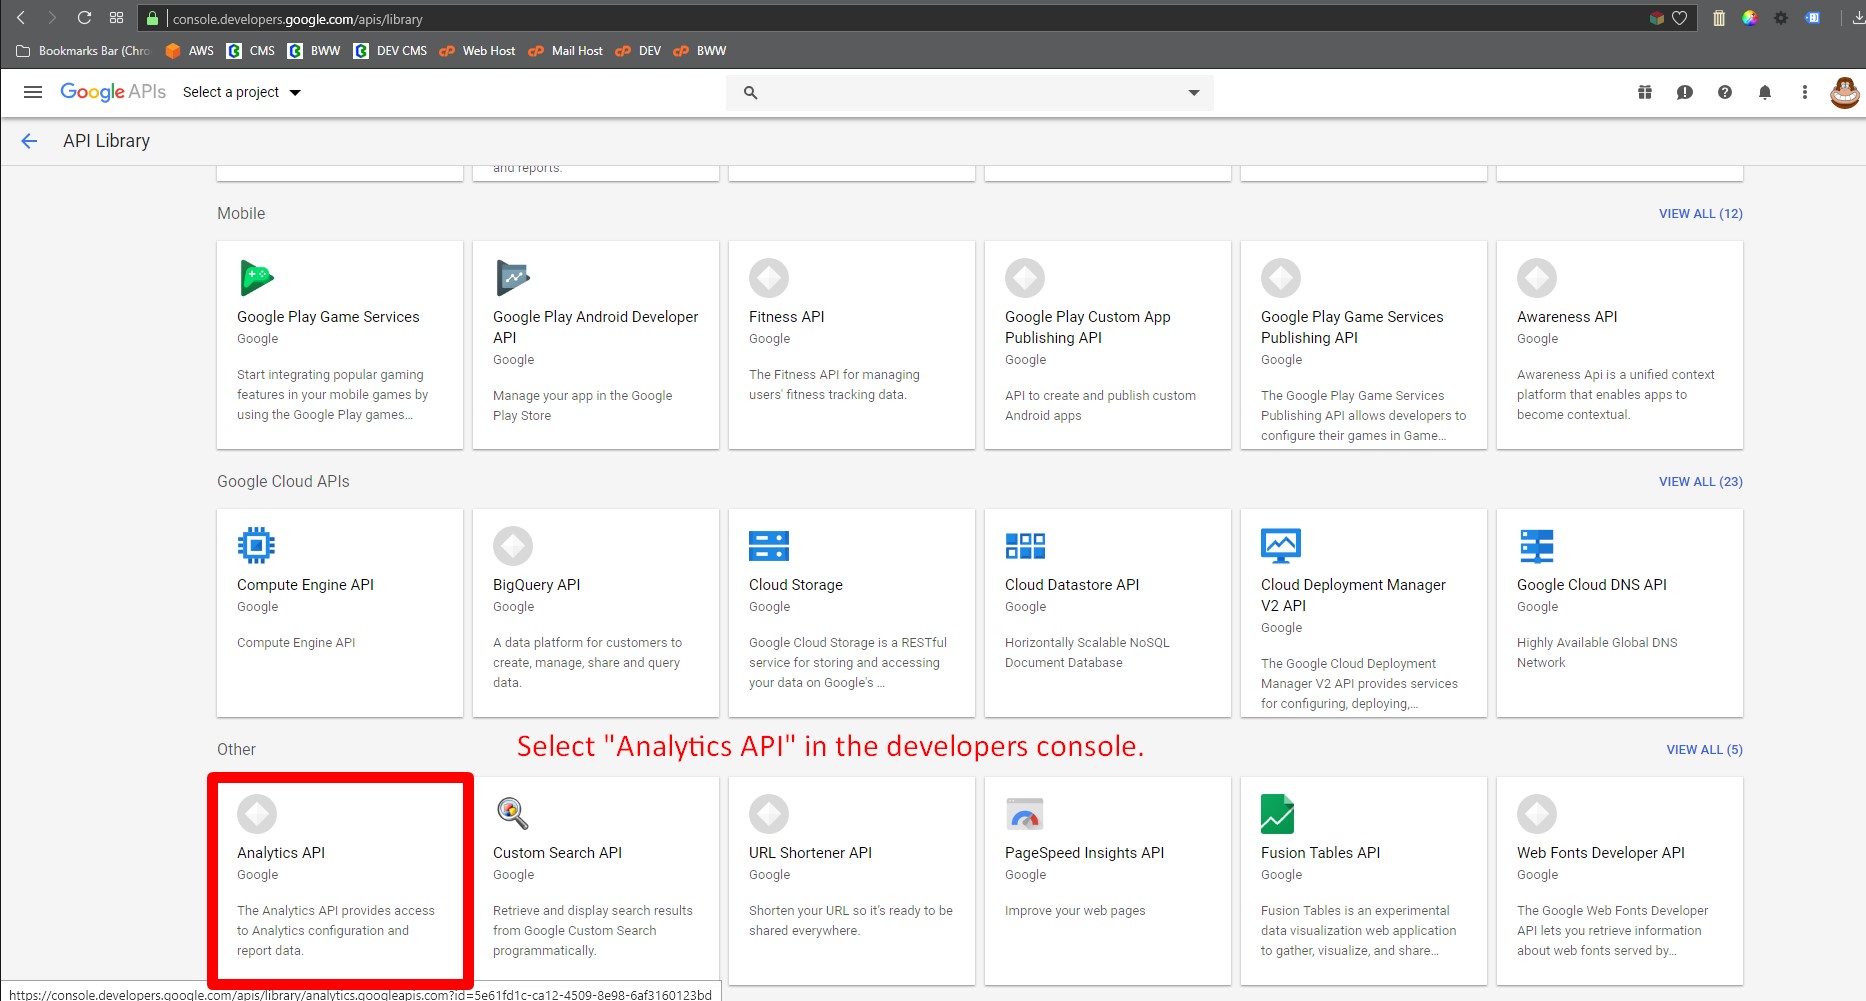
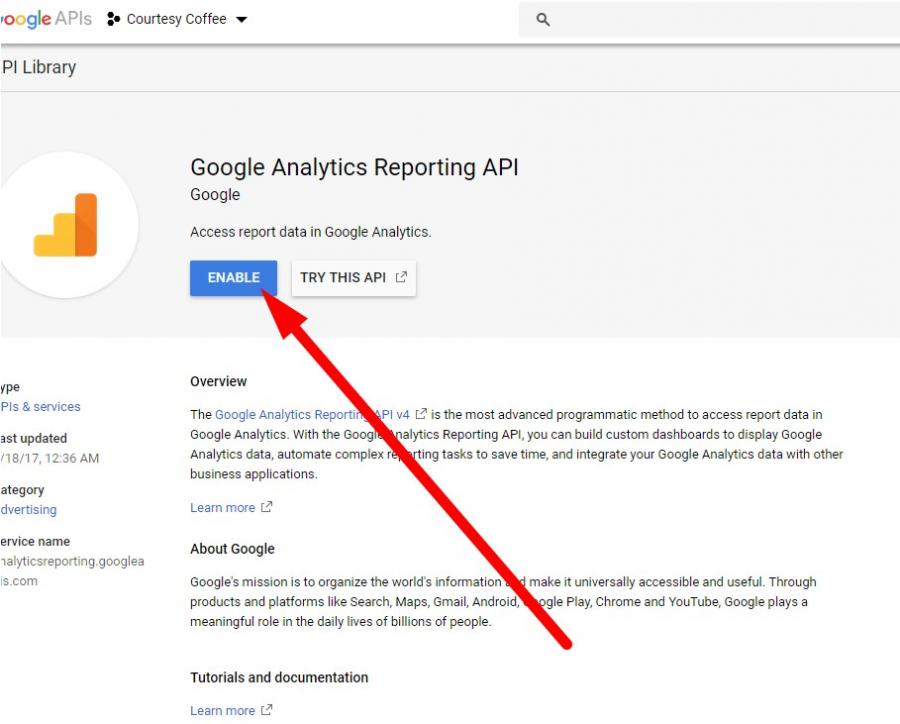
Step 10. Tap on Enable (or Manage) if already enabled
- You should now be on the page for Analytics API
- You'll see a "ENABLE" button (or this button could say "MANAGE" as well if it has already been enabled ...
- Tap on it
- See screenshot below
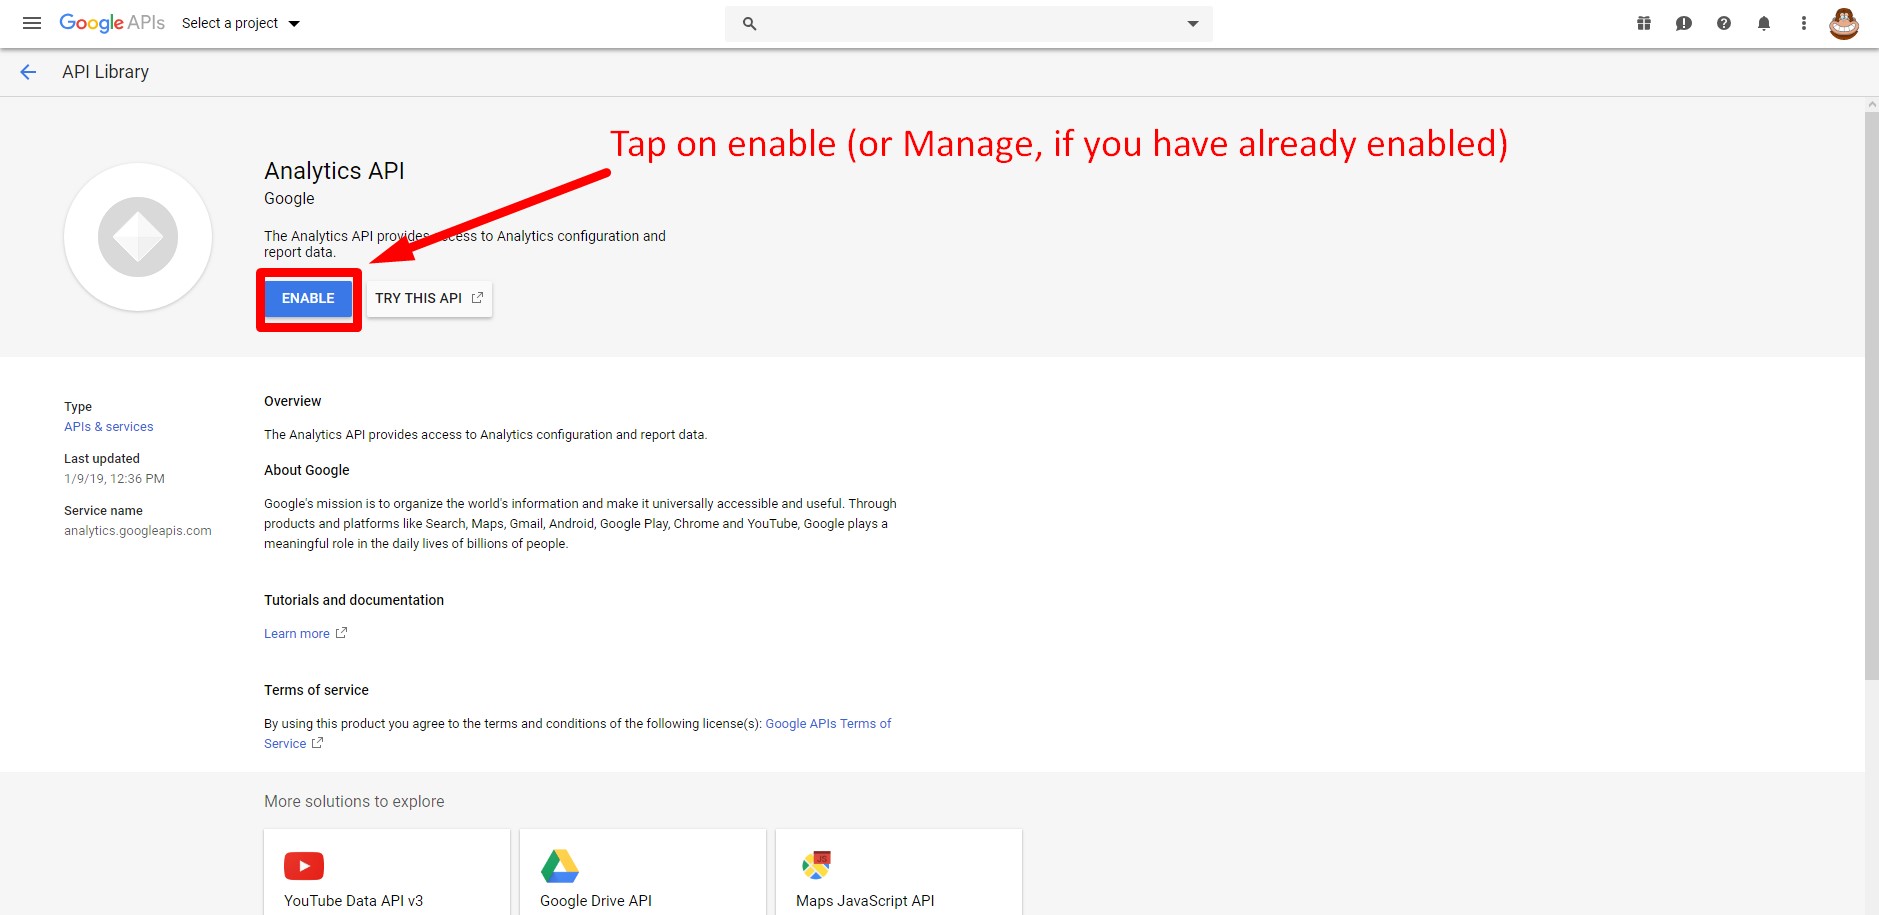
Step 11. Tap on Select a project
- You'll see a dropdown at top for Select a project
- Tap on this and it will open a popup where you can create a new project
- See screenshot below
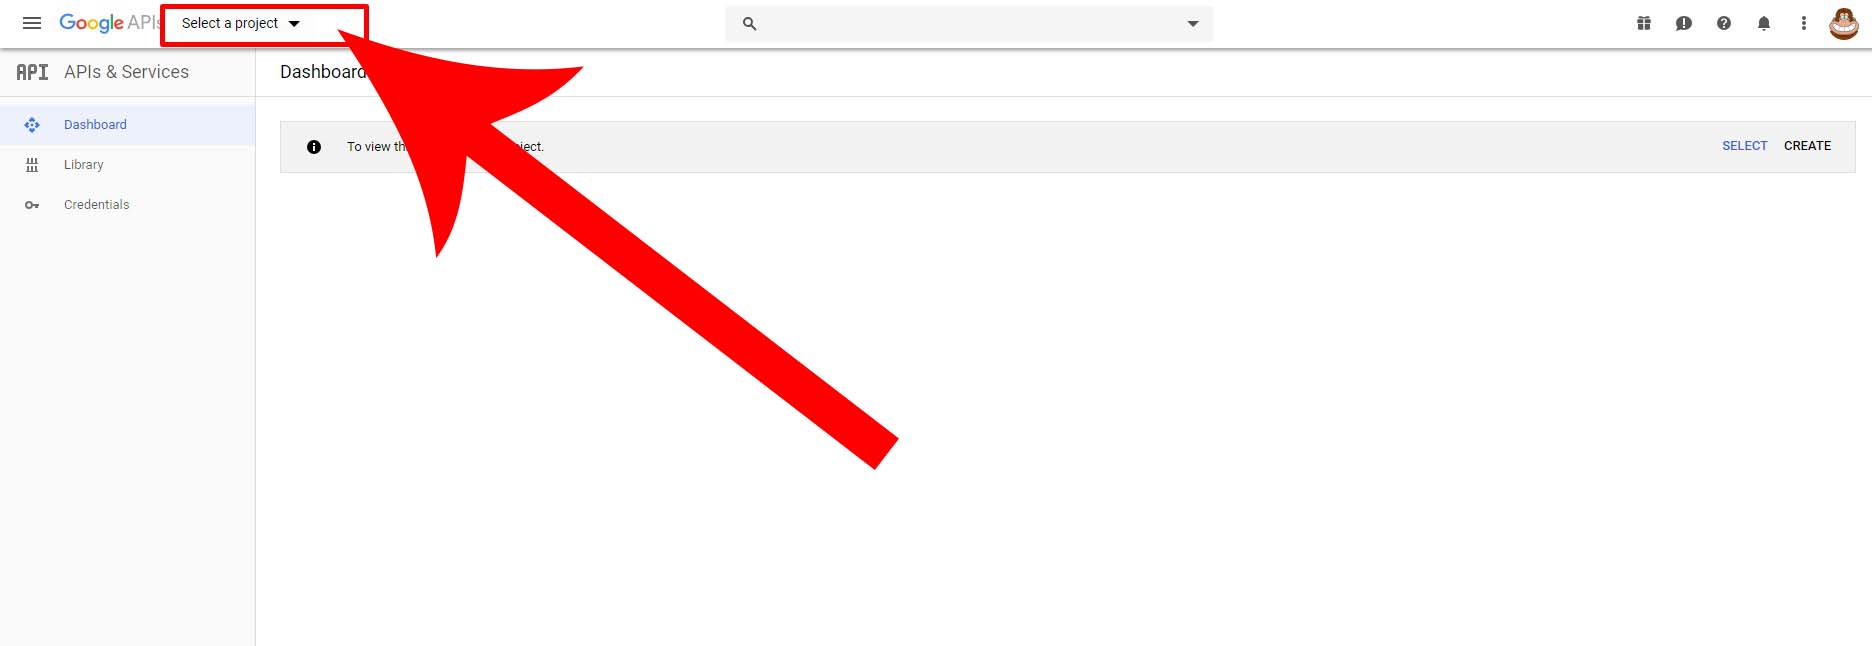
Step 12. Tap on NEW PROJECT
- From the previous step, you will have a popup window open for Select a project'
- See in the upper-right a button labeled NEW PROJECT
- IGNORE the default "My First Project" - just create a new one
- See screenshot below
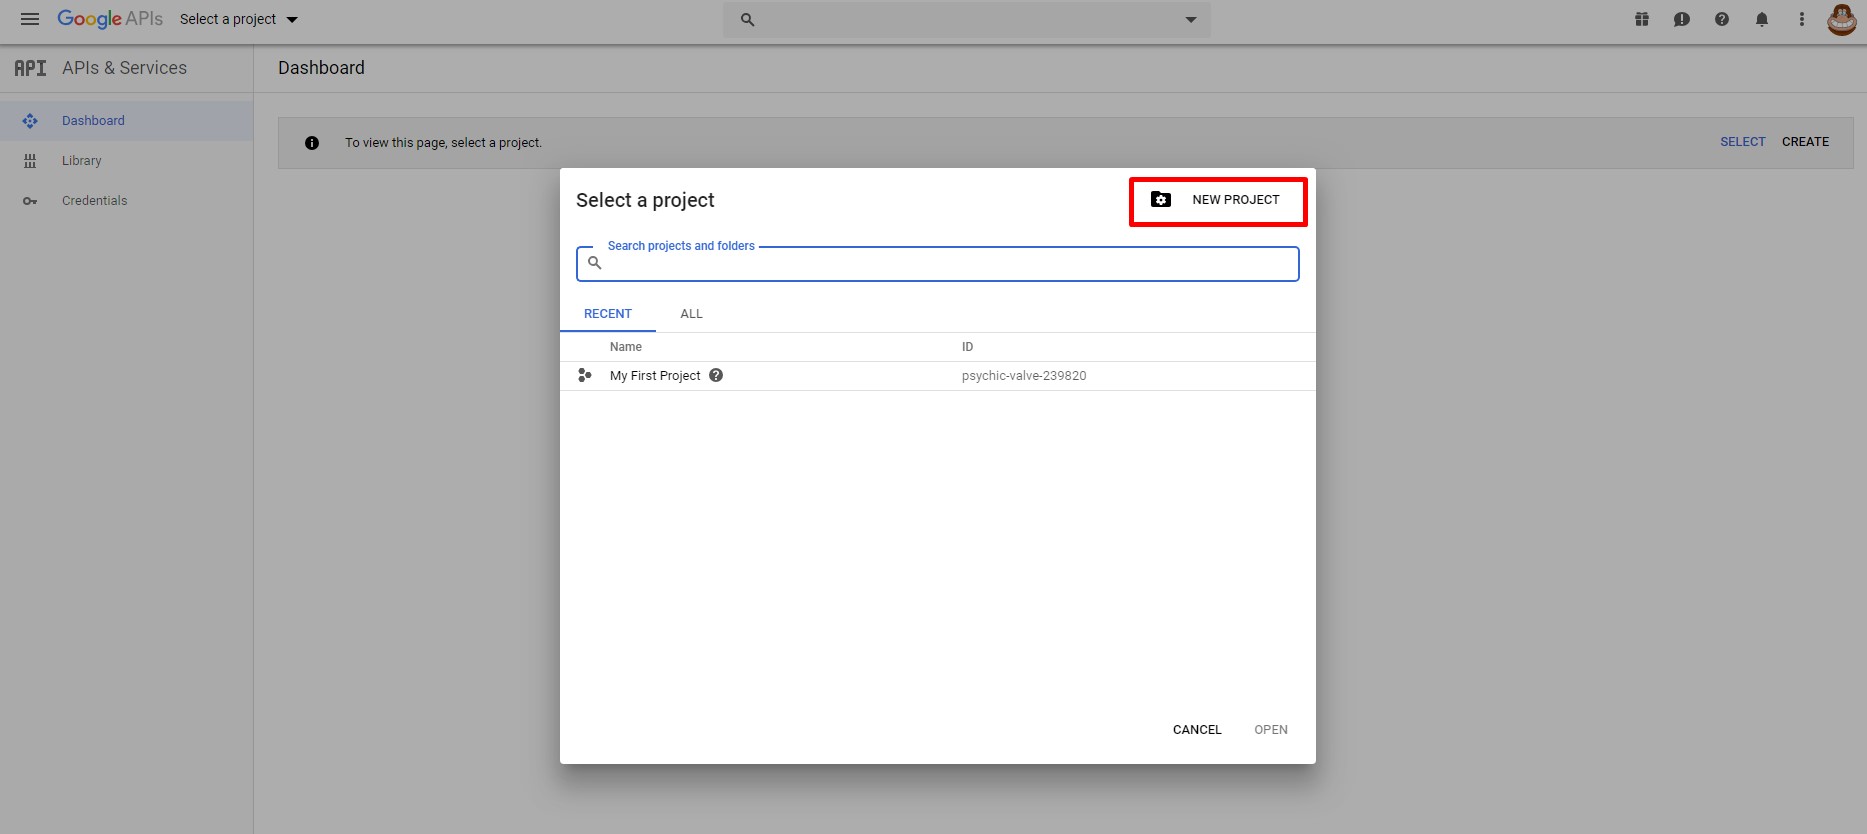
Step 13. Name your New Project
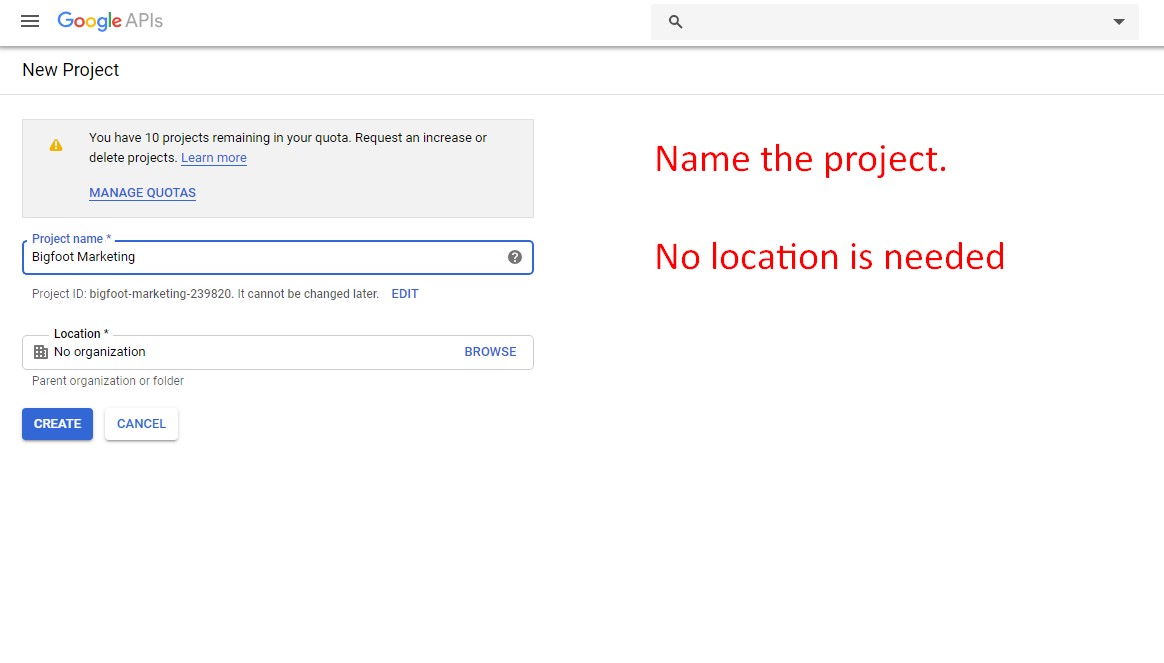
- You are now on the New Project section
- You should see a field for Project name*
- Name the project (using your business or website's name is typical)
- You may IGNORE the Location* field that is below the Project name :-)
- See screenshot below
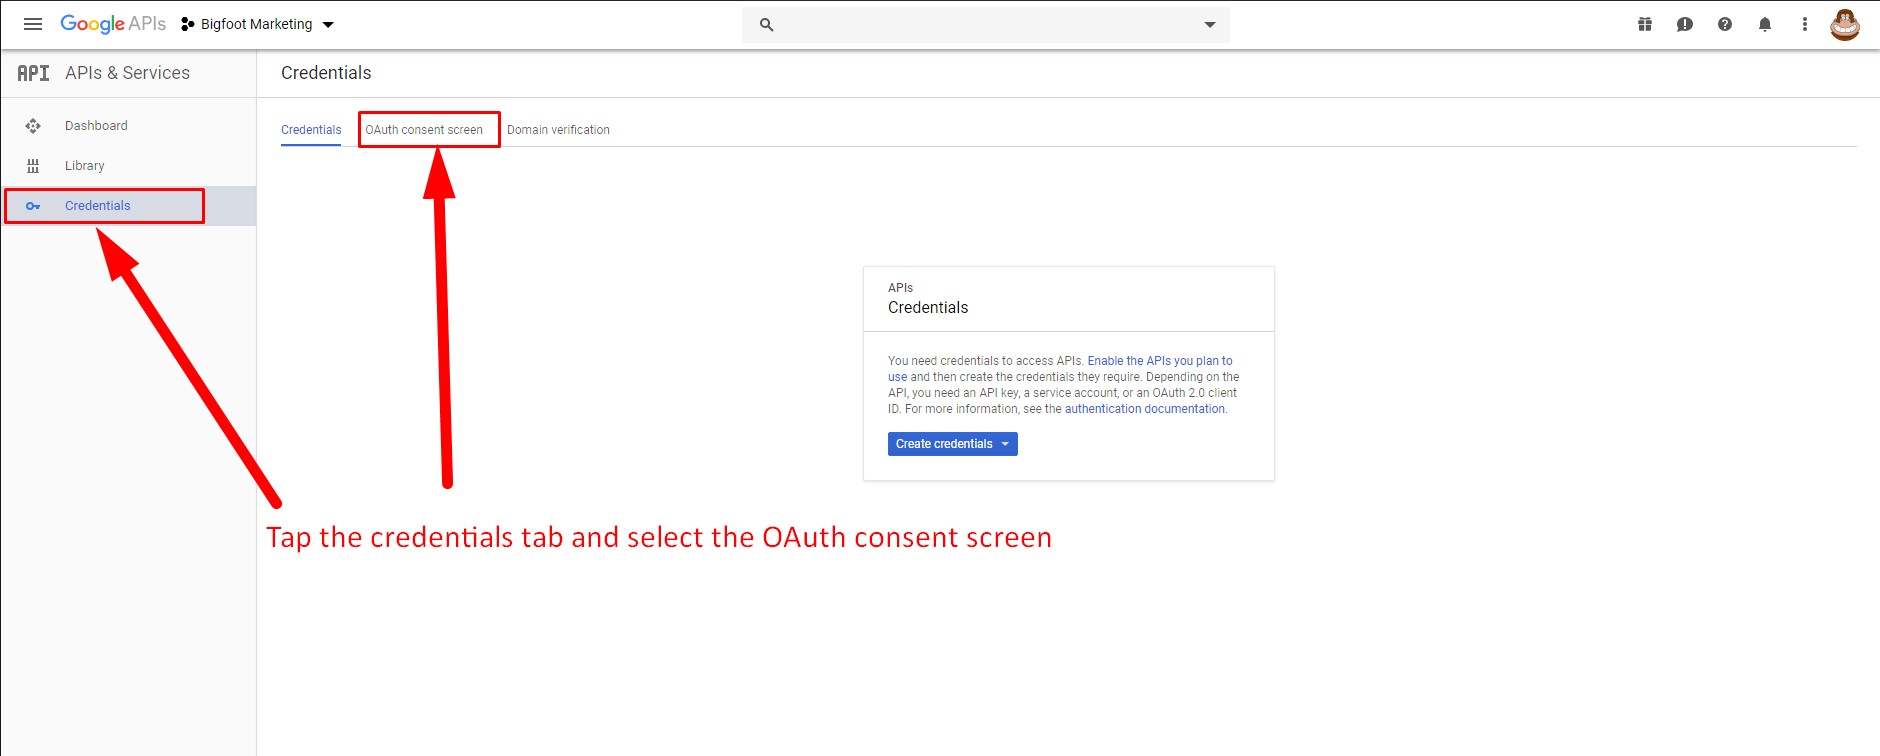
Step 14. Tap Credentials Tab and then OAuth consent screen button
- You should now see your Project name on the top of the screen
- First tap on the Credentials on left (has a key icon)
- Second tap on the OAuth consent screen
- If you don't see the form loading for you to create credentials, tap on the Create credentials button
- See the screenshot below
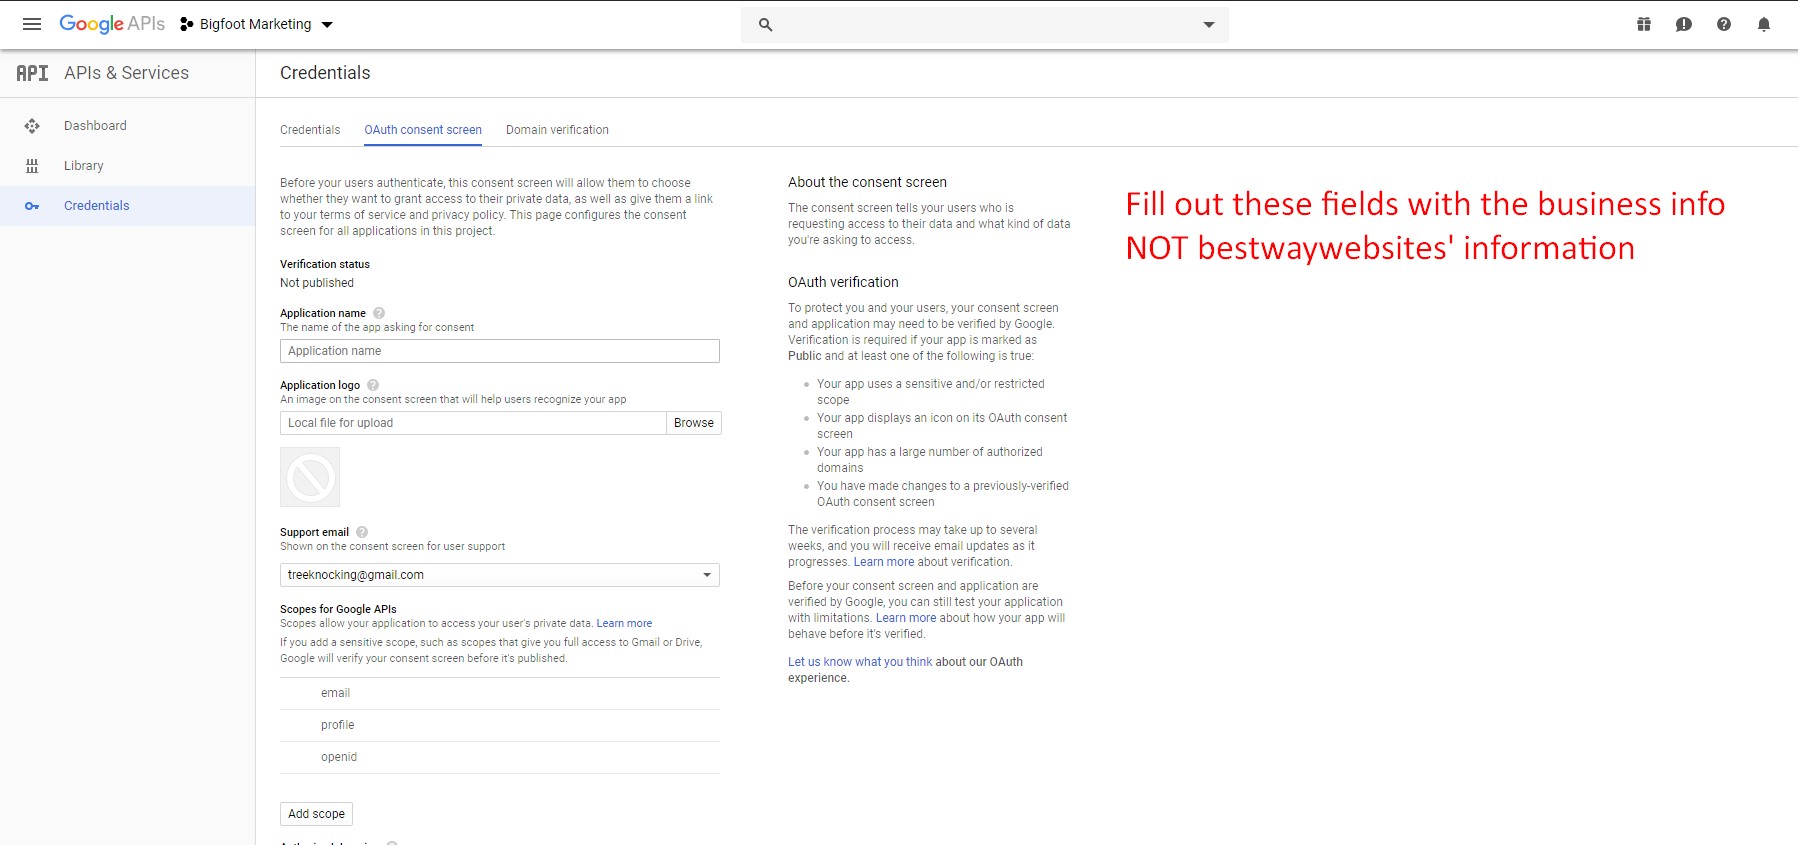
Step 15. Fill out the OAuth consent screen information with your business information
- The form to complete your OAuth consent should now be open
- Enter your own business information into this form to complete it
- There is more on this screen, but you will see in next step
- See screenshot below
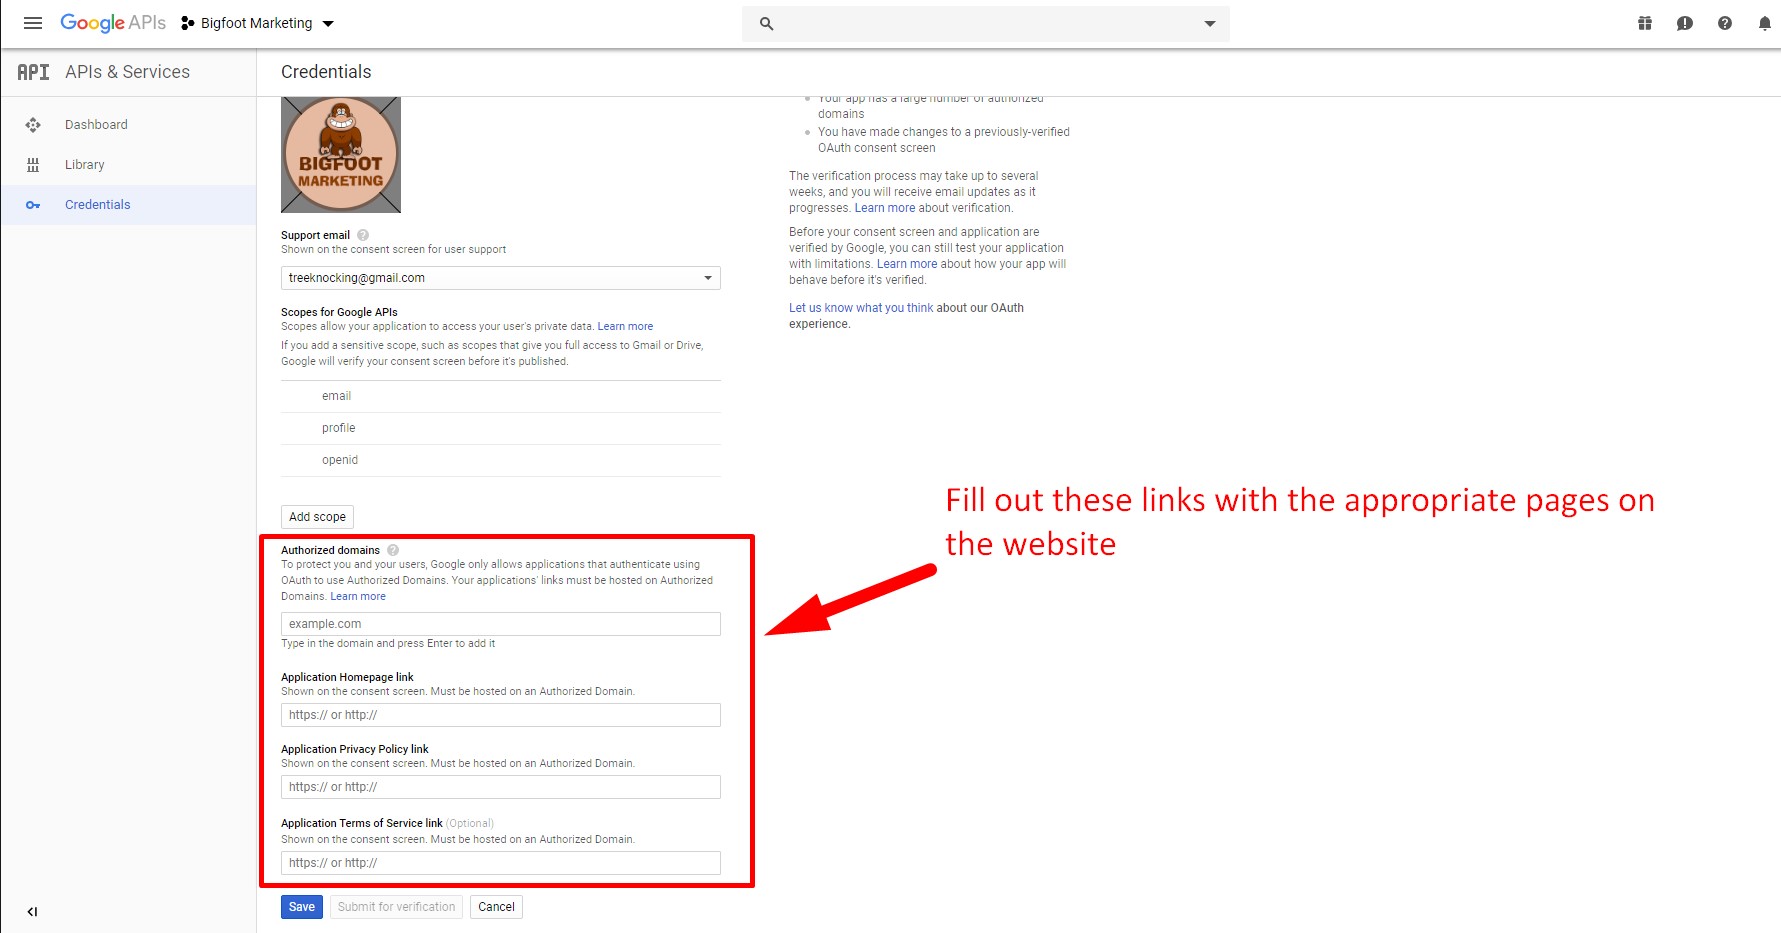
Step 16. Fill out the OAuth consent screen with your domain and links to pages
- Provide your domain name
- Your home page URL
- Your privacy policy URL
- Your terms of service URL (if you have one)
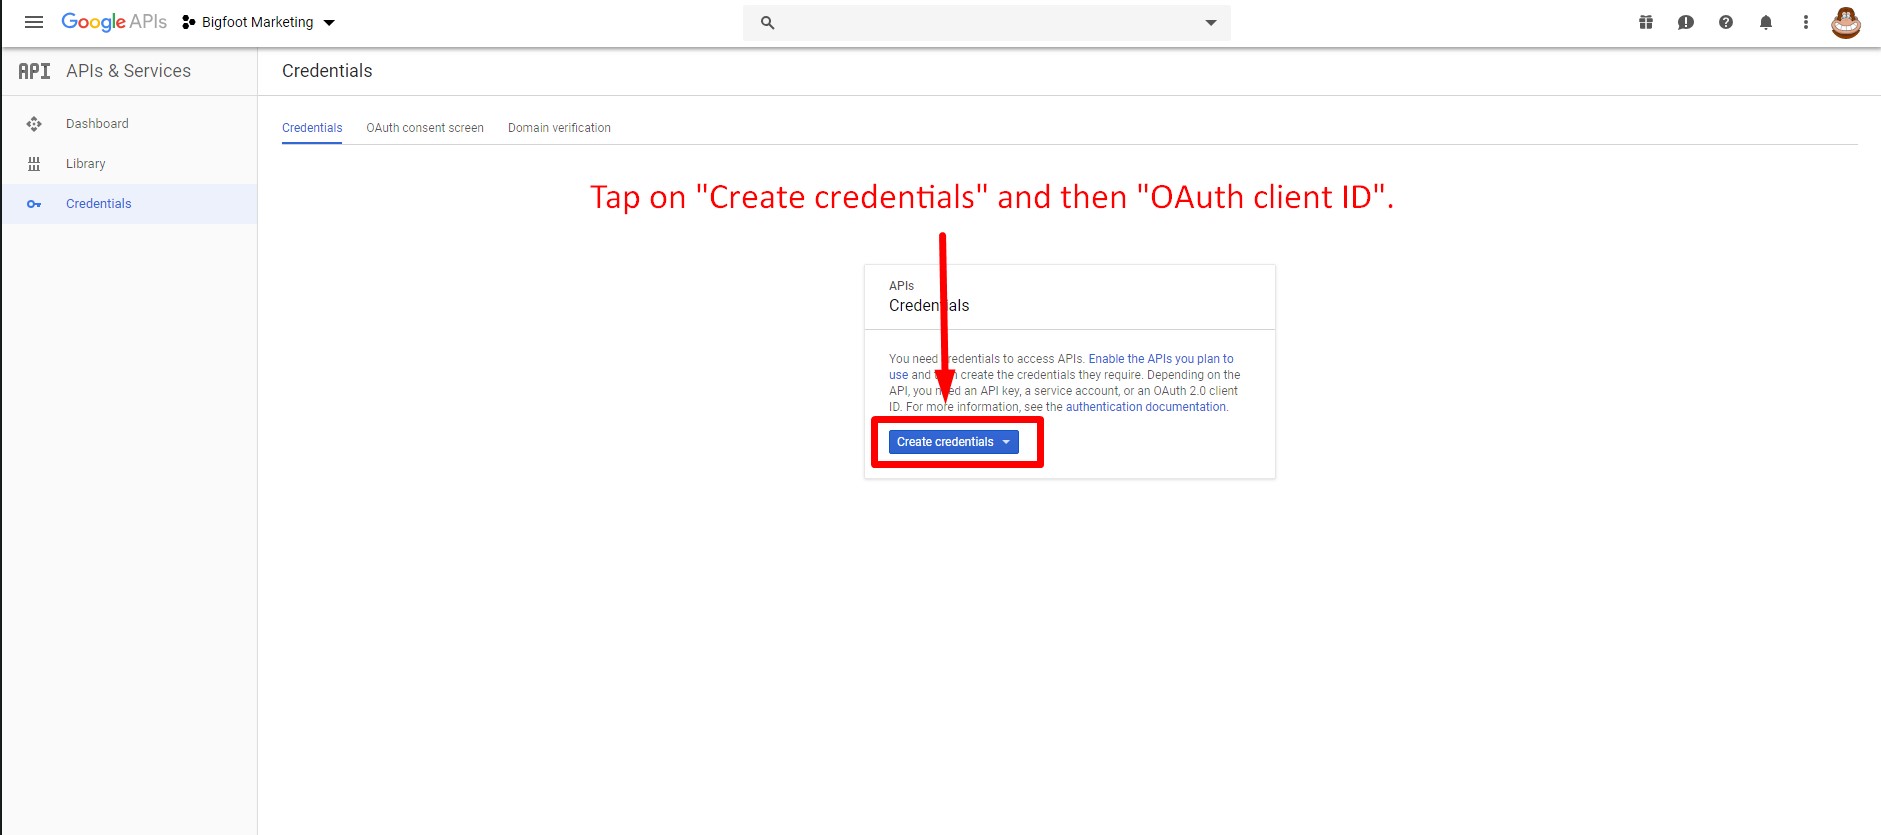
Step 17. Create your API credentials
- You should now be on the Credentials tab
- Tap on the "Create credentials" button
- When dropdown opens, select "OAuth client ID"
- See screenshot below
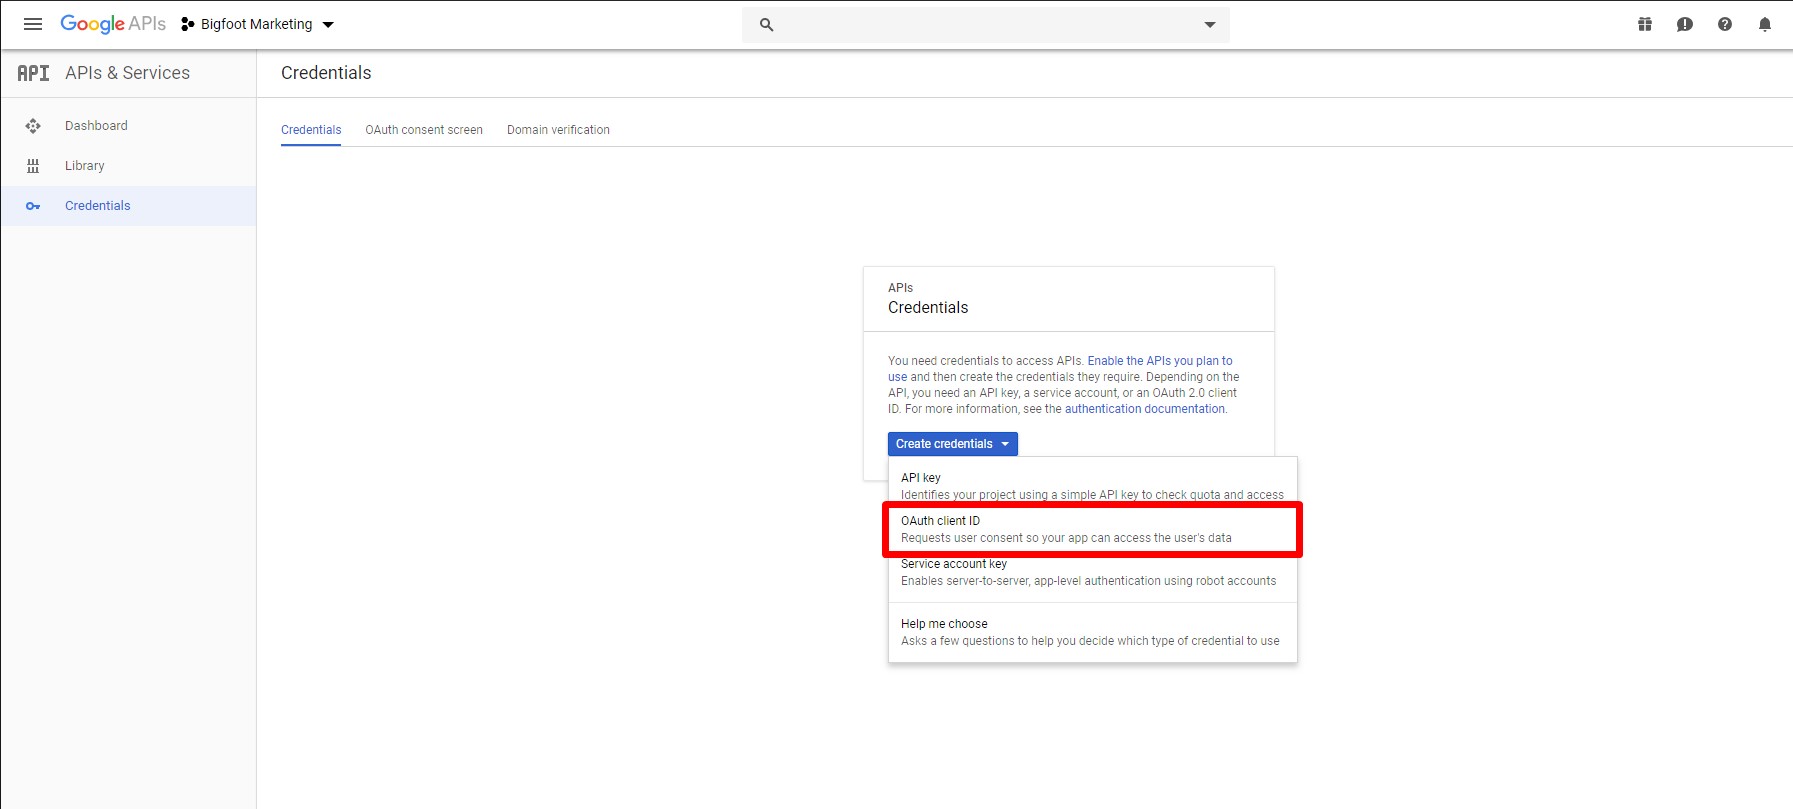
Step 18. Set your credentials for OAuth client ID
- The Create credentials tab opens a drop-down when tapped
- You'll want to select "OAuth client ID"
- See screenshot below
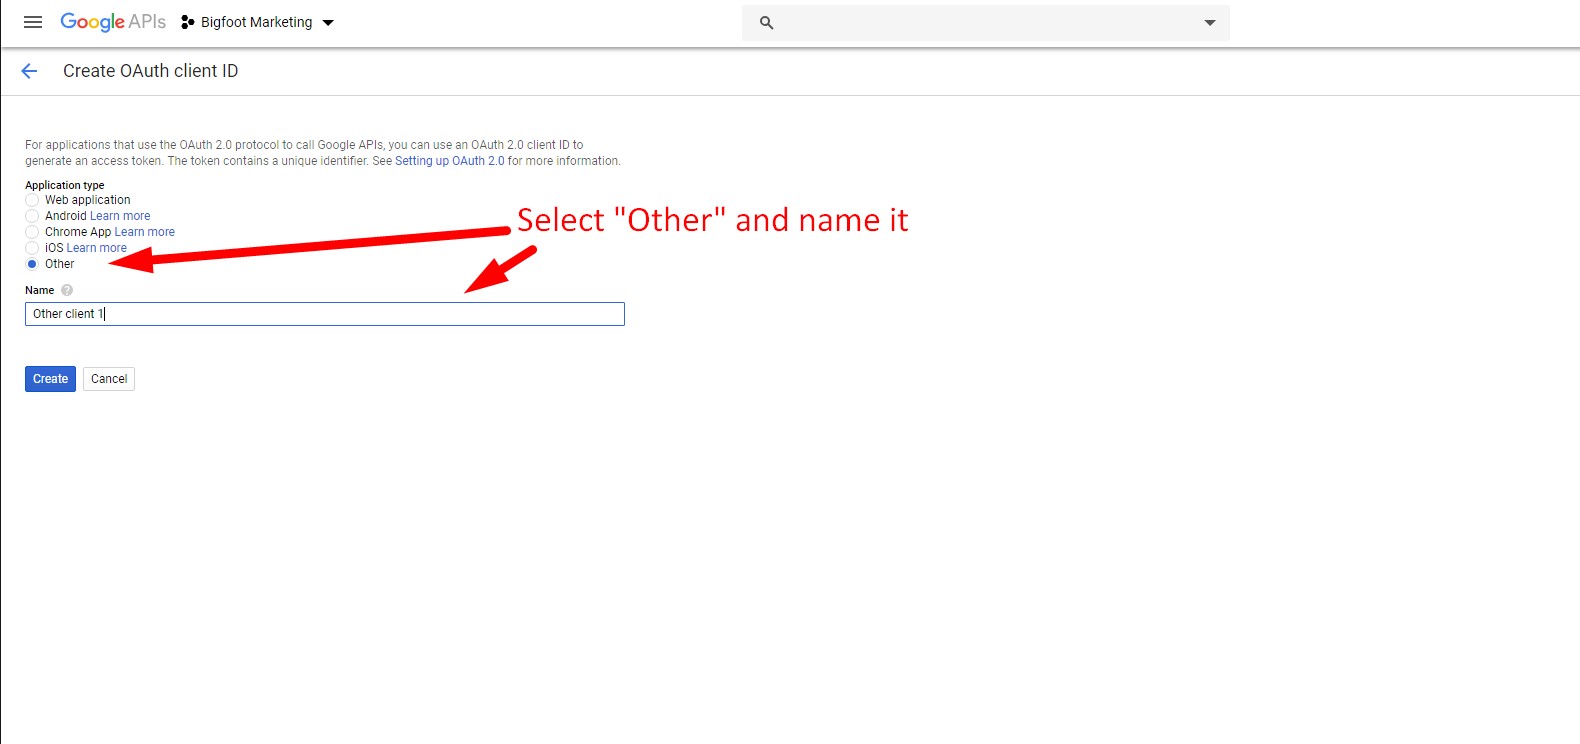
Step 19. Select your application type as "Other"
- You should be at the section that says <- Create OAuth client ID at top of page
- You'll see radio buttons with different options for Application type
- Select "Other"
- Name it: your business or website name is fine
- See screenshot below
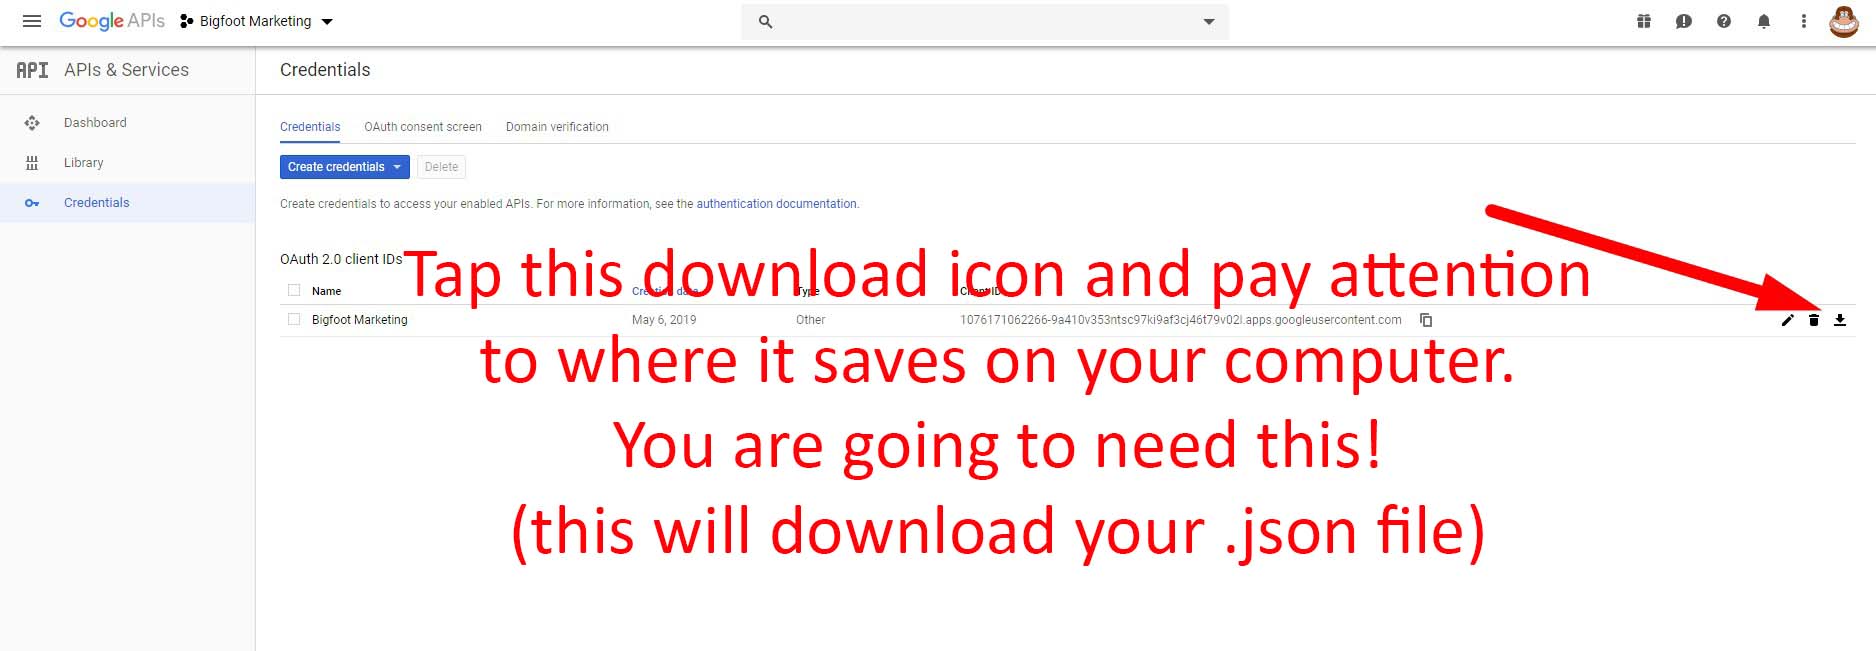
Step 20. Download your credentials (.json file)
- You should now see a line with your Client ID in it
- Look to the far-right and find the download icon (a down arrow)
- Tap on this arrow to download the file and pay attention where this is saved because you will need to upload it later
- See the screenshot below
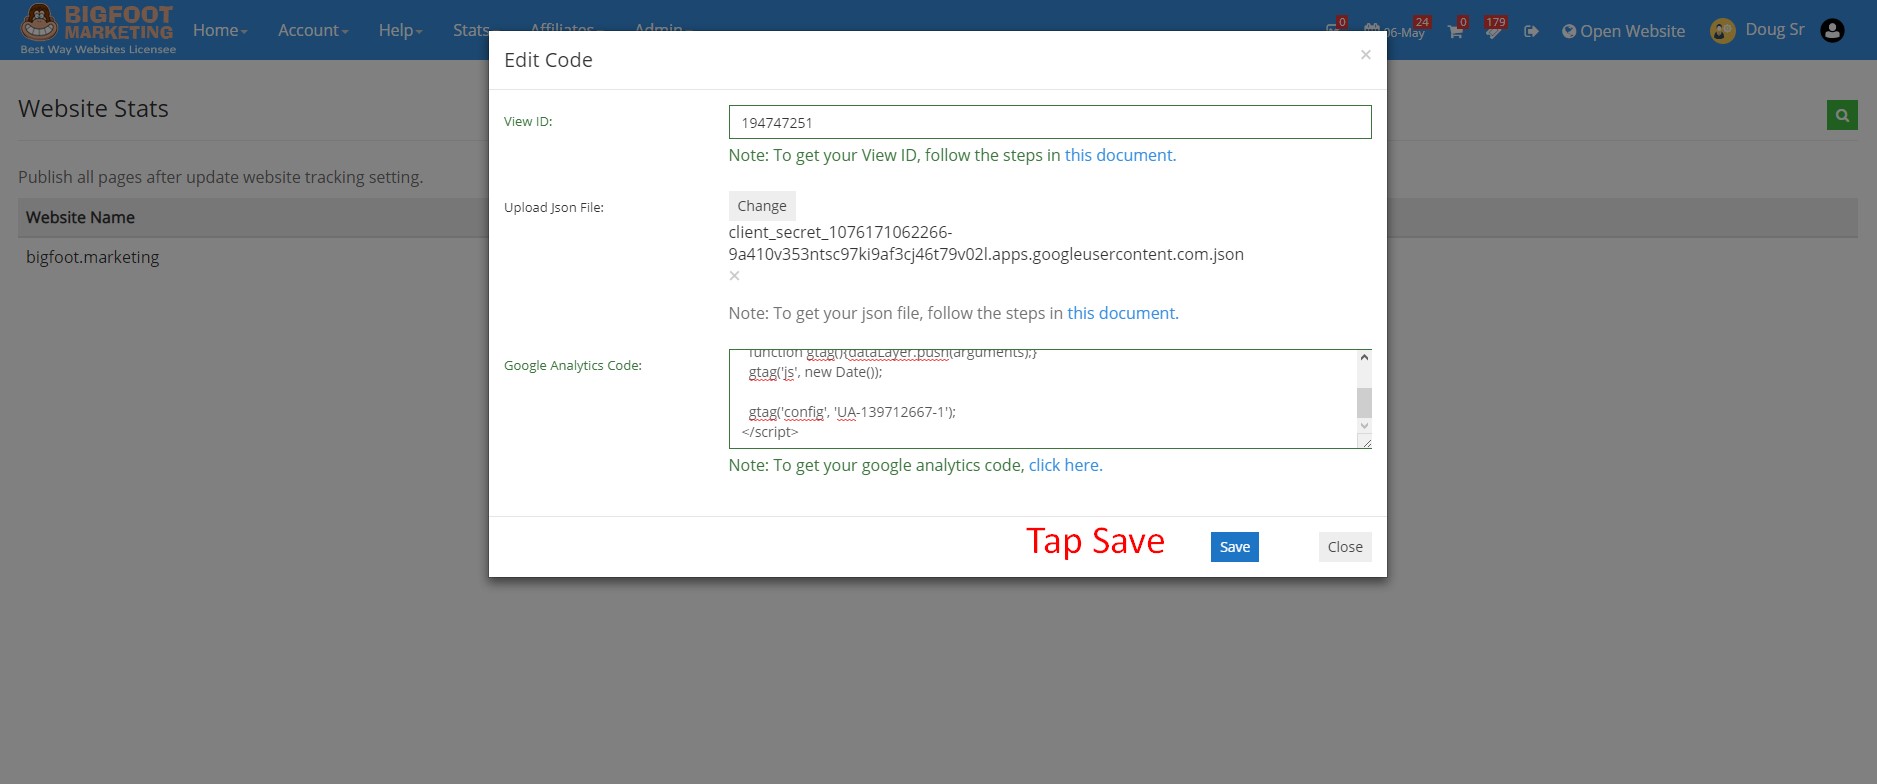
Step 21. Open CMS and go to Webstats to Edit Code and Upload Your .json File
- Go to Stats > Webstats > Setup Google Analytics
- Tap the green edit icon on right
- It will open popup so you can enter code (next step)
- See screenshot below
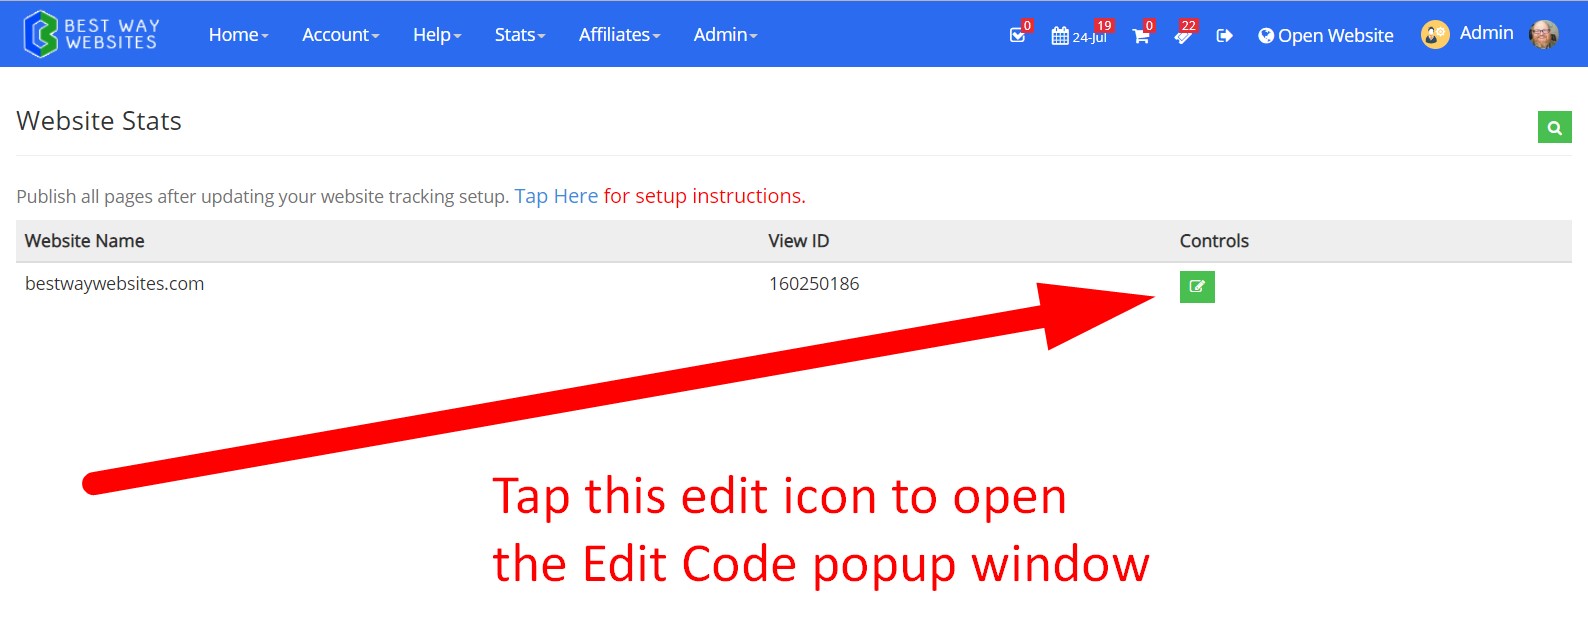
Step 22. Upload your .json File that you Saved to Your Computer in Previous Step
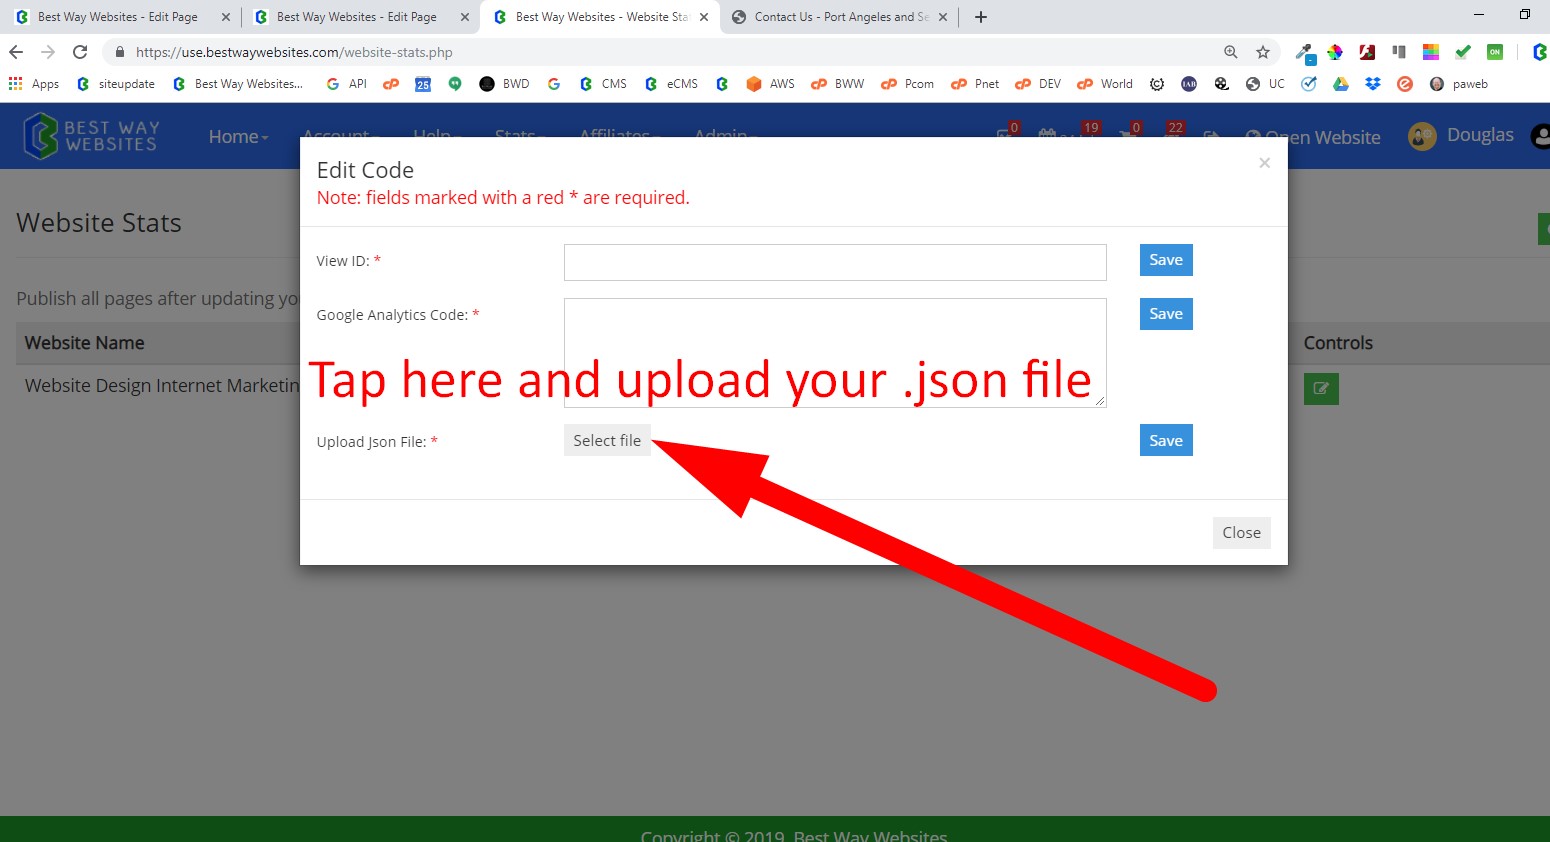
- You should still be on Stats > Webstats > Setup Google Analytics in the CMS
- A popup window should now be open
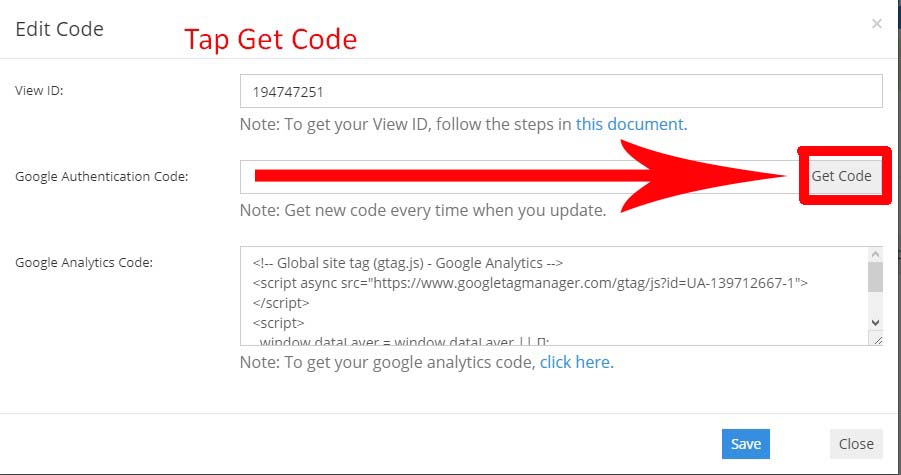
Step 23. In CMS, tap the Get Code Button
- After you have uploaded your .json file, you will see your Google Analytics Code: box automatically populate with your data
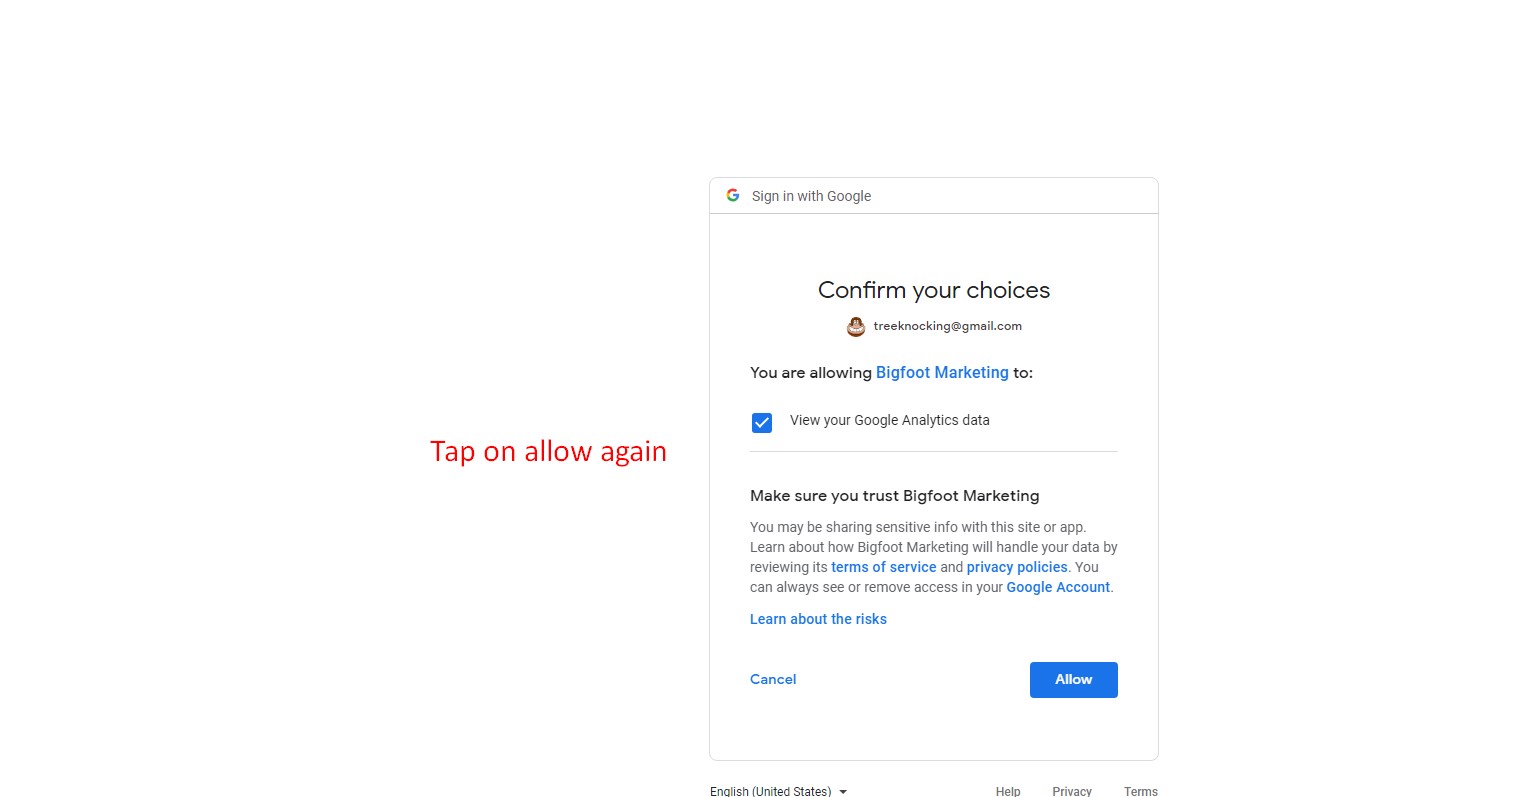
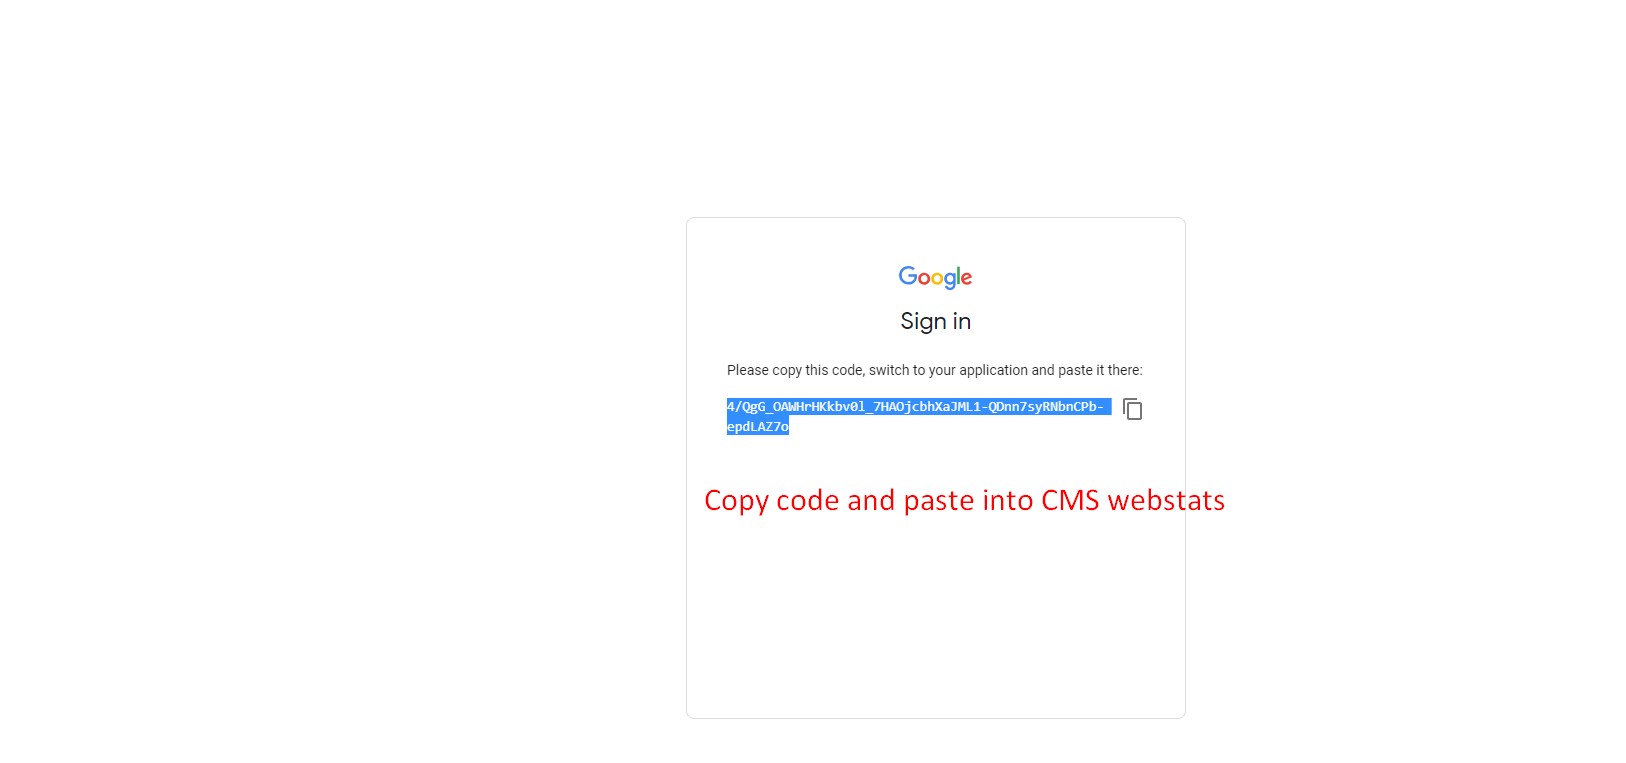
- Now, you can get your Google Authentication Code
- Tap on the Get Code button
- See screenshot below

Login to: https://console.developers.google.com/apis/library




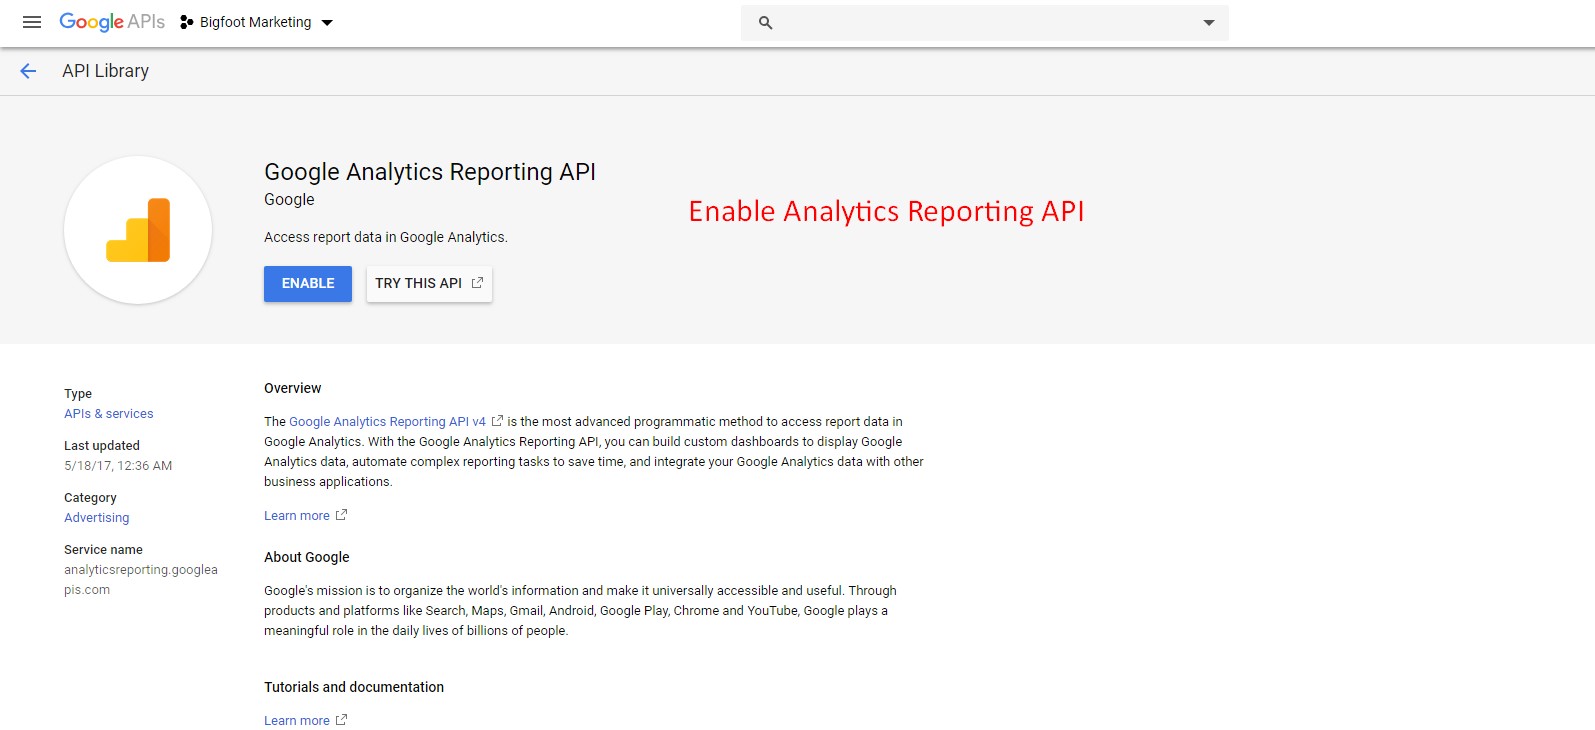
Final Step - Enable Analytics Reporting API
Tap this URL: https://console.developers.google.com/apis/api/analyticsreporting.googleapis.com
It will take a few minutes and you should start seeing the google analytics in your panel.
Initially, you may see error popup warnings, but they will go away after a few moments.
